
Woven Hip Harness - One-Sided - Locked with Half-hitch
By Lazarus Redmayne
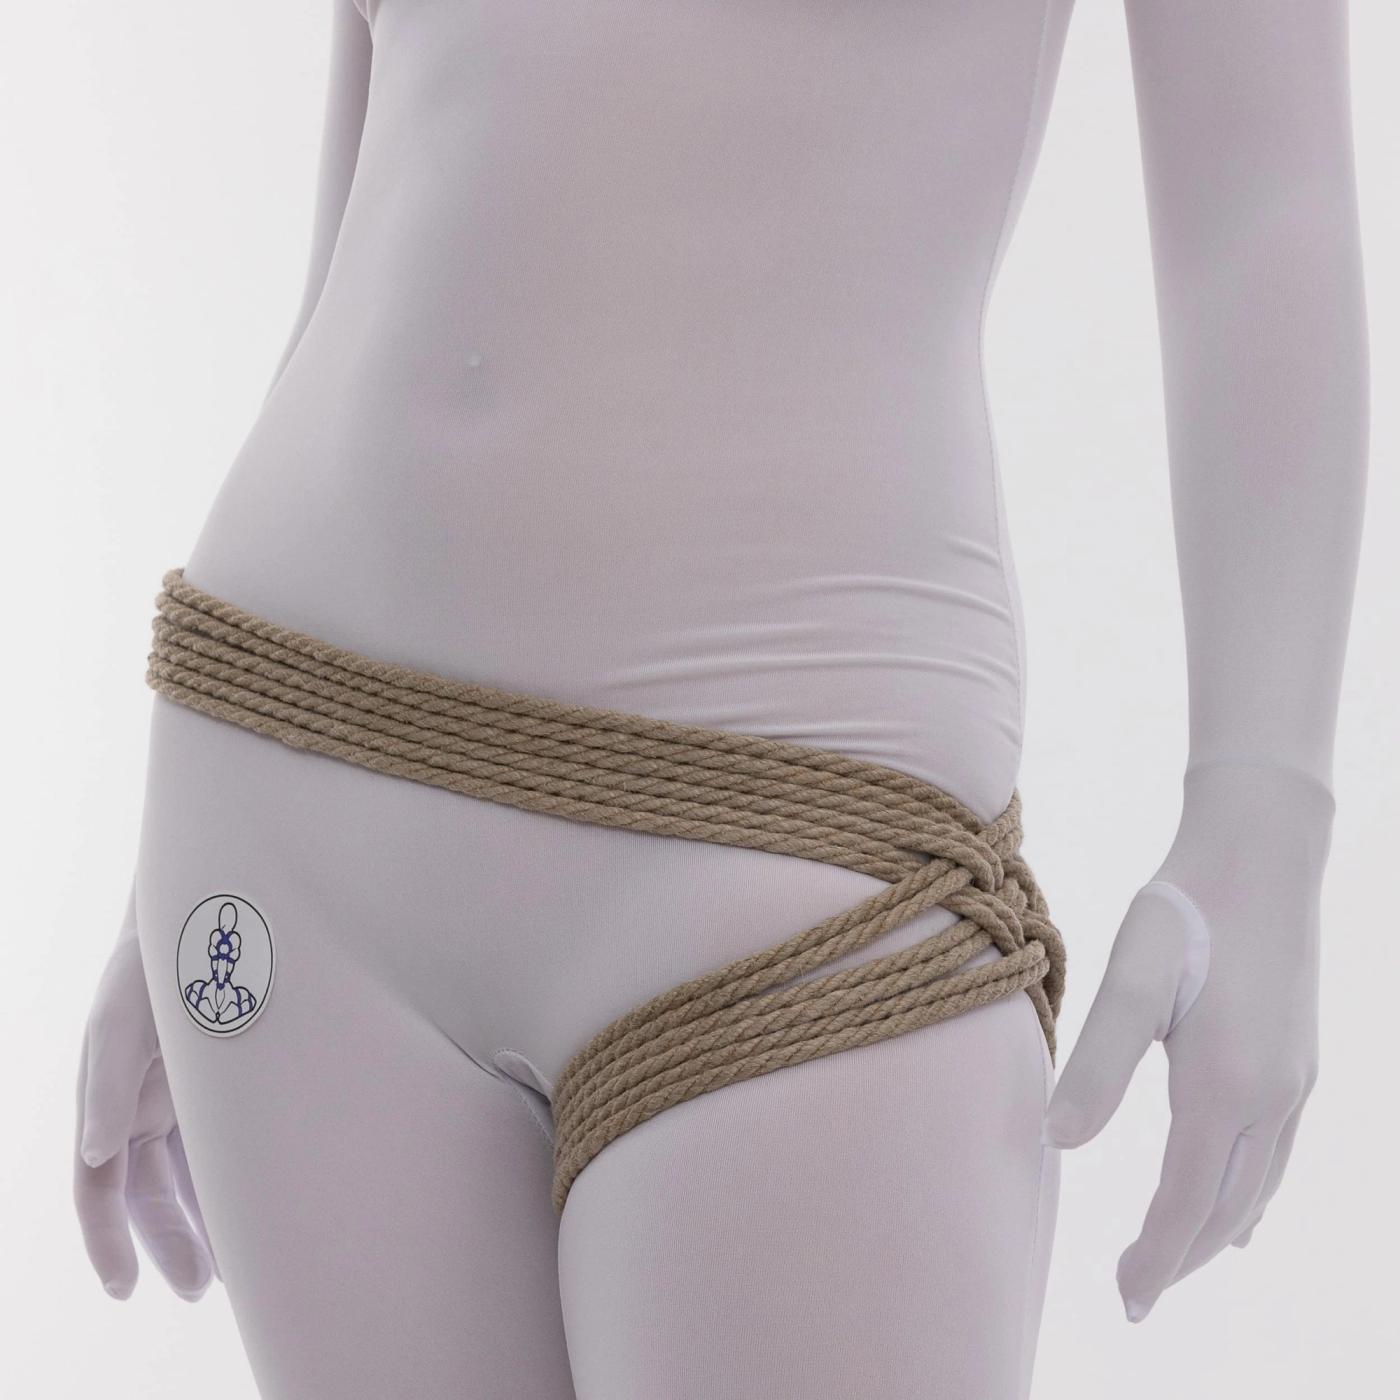
This attractive harness is simple, fast to tie, and can be used for suspensions, but only side suspensions with the weave facing down, and only where the chest is even with or higher than the hips, as in a horizontal side suspension; do not use this for inversions. It allows you to have a single connection point that transfers the pressure to the opposite hip joint, nicely cradling and supporting your partner on a very strong part of their body. With practice, this can be tied in around 2 minutes.
This is a part of a series of related woven hip harness with similar features:
- Woven Hip Harness – One-Sided – Locked with Half-hitch (This tutorial)
- Woven Hip Harness – One-Sided – Rosette
- Woven Hip Harness – Two-Sided – Rosette
- The Leto Hip Harness
This variant is the fastest to tie, but also has the least friction in the weave. Depending on factors, some find that this version is more apt to tighten on the inner thigh. If that is the case for you, try the Rosette version to see if that suits you better.
Use this in combination with a supportive chest harness like the Shinju, RopeFairy’s Caress or Fisherman’s Harness (among many other great choices) to allow your partner to lay sideways in rope. Also consider adding support for their legs, perhaps with just a simple Somerville Bowline or other Single Column above each knee or both knee and ankle, or with something more detailed like a Suspension Futomomo.
Risk Management and Safety
Do not use this if you intend to invert your partner to any degree where their head is lower than their hips. This harness provides great support if the force is angled upward toward the head and at any degree between that and straight out to the side. But note that this version does not have much keeping if from sliding down. Therefore, if the force is pointing downward at all, you run the risk of the harness sliding down over the hip. If you plan to have your partner tipped to any further than horizontal, choose a different harness, one that anchors solidly to the waist, perhaps the Drum Harness or Leto Harness.
Rope Needed
For this tutorial, I used one 30' (~9m) piece of Natural 1/4" (6mm) hemp. Extend your rope if you need more; use it up if you have too much.
I use an amazing Natural hemp rope provided by my affiliate Twisted Monk. Check them out!
Prerequisites


More Like This…


Video
Video Contents:
- Core Technique (0:21)
- Horizontal Side Suspension Connection Point Demonstration (6:31)
Pictures & Text
This is shown on the left side: I am going to tie this so that the weave is on my partner’s left side. Tied this way it will be the left side that will face downward if this tie were to be used in a side suspension.
To do this on the right side: In the directions below, I direct you to use the right or left hand. Doing it in this way will increase your speed and efficiency. If you want to tie this so that the weave is on the right side, just reverse everything below. (That is: When I say “right hand” use your left, etc.)
Rope length: I used one 30’ (9m) rope. That was sufficient for this particular person, with this particular build, to give me a total of three wraps. If I was tying a person with a different build or if I needed 4 wraps, etc., I would need a different amount of rope. Keep in mind that you can extend your rope, if you need more.
Get your rope ready and place it a little in front of your partner on the side that will have the weave (the side that will be facing downward if you use this for a suspension; in this case, the left side).
Stand behind your partner and slightly to the left side. Grab the bight with your right hand.
Run the bight between your partner’s legs from back to front.
Using your left hand, reach around your partner to grab the bight.
Pull the bight slightly out until it can reach the side of the body. Keep the bight anchored there with your left hand for the moment.
Using your right hand, add tension to your rope, then bring the rope toward your left hand, keep it snug against the bottom of the butt cheek.
Hand the rope to your left hand so that it is holding both the bight and the rope.
Release the rope with your right hand, then put your right arm around your partner and grab the rope with your right hand again.
Arrange it so that the bight end is on top of the tail, with the bight in your left hand and the rope in your right hand.
Now you can give a little slack with your right hand and gently pull with your left.
This will let you slide your rope around your partner’s leg, and let you increase the amount of rope on the bight side.
Bring the bight up behind your partner, to a point just short of their side.
Run the tail through the bight and reverse tension. Add tension to the rope until it has a nice grip on the skin throughout. It can be helpful to run your fingers under the rope all the way around the waist/hip and leg parts to make sure it is at the same level of tension everywhere.
You want it tight enough to grip the skin, but not so tight as to cause compression injuries. For many people, it can comfortably be quite tight, but you don’t want to wrench it down. As always, keep safety at the forefront of your plans. Instruct your partner on how to tell if something feels wrong and order them to tell you if the feel anything weird or unexpected.
Now that you have the path and the tension set, you can add additional wraps. Run the tail back the other direction, keeping this wrap below the one that is already there. Do this with care and attention. Make sure that the strands remain parallel, that they have the same level of tension on the skin as the ropes beside them, and that they do not get twisted.
When you come to where the ropes cross, move that crossing point to be right in the middle, at the direct side of the body.
When your tail gets to this point, weave it in. As the prior wrap is under the crossing line, leave this one on top.
Continue to wrap. Continue to make sure the wraps are parallel and evenly tensioned.
Continue to wrap.
Back at the side, weave the tail in again.
When you have completed the weave, it adds a little friction. This is a good time to check the tension in lines you have just completed, to confirm that they continue to all have the same level of pressure on the skin.
Continue to wrap. When you get back to the node, just keep going. No need to reverse tension at this point again until you have completed your wraps. Doing so will just add unnecessary bulk.
(This is just like when you do multiple wraps as part of a Lark’s Head Single Column.)
Continue to wrap. When you get to the side again, weave the tail into the pattern.
Once you have completed your weave…
…check the tensions in your prior wraps, adjust if necessary.
Continue to wrap…
…
…
…and weave…
…and confirm the lines are laying properly. Back…
…and front.
Bring the tail back to the primary node.
Run it through the secondary bight and reverse tension (just as with a Lark’s Head Single Column).
Check the tension in the lines you just laid down.
Lock off with a Half Hitch.
Make sure this has a good, solid grip.
Use up the rest of the rope however you wish.
I am just going to wrap it around the strap a few times, then tuck the ends between the strands.
Completed. This is the connection point for suspension.
This is how this element would work in a horizontal suspension. It needs to be accompanied by a chest harness to ensure that the chest cannot drop below the hips. It can also be helpful to provide support for the legs. A few ideas for both of these elements are included in the tutorial description above.
We shot this tutorial while still in the middle of setting up a new studio, so we didn’t have any hard points installed yet. Hence, me just holding Blue up manually while she planks and balances herself. 😊
Comments
Loading comments...
Sign in to leave a comment.