
Building Blocks - Junctions - Drill
By Lazarus Redmayne
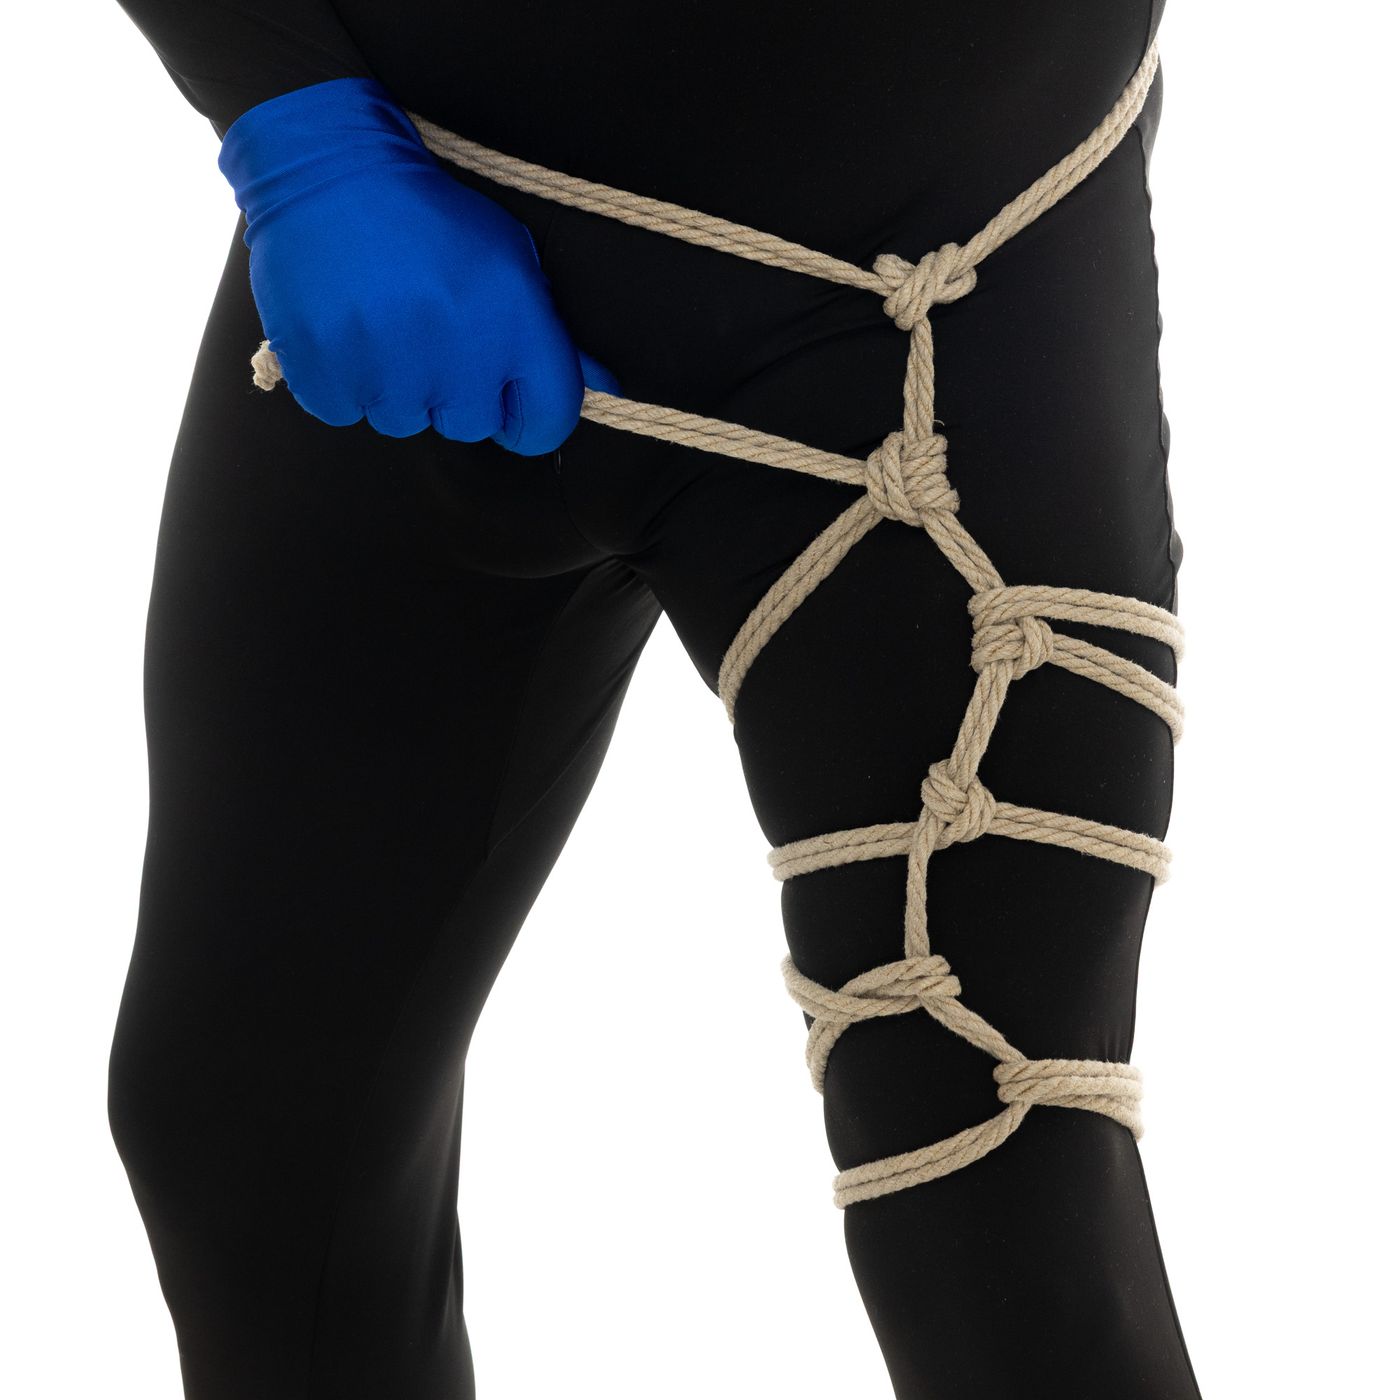
I was teaching the rope track at Swinkation in 2025. Two of the people that run Swinkation – PhoenixPhyre and Myrina -- were at a class where I was going over the Junctions and how they relate to each other. Afterwards, Phoenix pulled me aside to show me this very cool practice drill! Thanks, Phoenix!
When the working end of your rope comes to a line you have already layed down, you have several choices for how they will interact. You will do different things depending on which direction you want your rope to flow as it moves away from that line. It turns out that most of those options are tightly related! I talk about those relationships in the Building Blocks - Junctions tutorial.
Once you have gone through that tutorial and understand how they all relate, you now need to practice! Practice – specifically practicing the right things, doing them the right way – is how you build skill and confidence, developing the muscle memory to move quickly and surely.
Here is a great drill to practice your junctions and build experience and good rope handling. Each connection on this line only takes one more move than the one before it!
Start slow, make sure you are doing it correctly, that the ropes have the right tension (tight enough to hold, but not so tight that they are sinking into your skin deeper than half their diameter), that you are doing each step in the drill as it will make sure you are practicing asymmetric techniques both directions so you don’t fall into the habit of only ever doing it one way and having trouble doing it the other!
Remember: Slow is smooth, smooth is fast. The point of the drills is smooth and clean motions. Speed will come as a natural result of practice.
Rope Needed
For this tutorial, I used one 30' (~9m) piece of Natural 1/4" (6mm) hemp.
I use an amazing Natural hemp rope provided by my affiliate Twisted Monk. Check them out!
Video
Video Contents:
- Setup (0:18)
- Drill:
- Reverse Tension (1:15)
- Twist (1:45)
- Crossing Hitch (2:21)
- Munter Hitch (3:05)
- Cow Hitch (3:39)
- Quick-Release (4:45)
Pictures & Text
You can do this on a partner, sure, but – assuming you might want to work on this yourself – let’s do this as a self exercise! Each node that you create will have one more level of complexity, one more tail pull each time to you get to the stem.
The setup:
Start with the rope anchored to your waist. You can attach it to your belt, or use the standard approach and add it with a Lark’s Head, but let do it a different way…
Just add a wrap around your waist and tie the bight to the stem using an Overhand Knot. This is your starting point.
Doing it this way instead of using a Lark’s Head will allow you to quickly release the drill when you are done.
Pull the knot into your waist
Run the rope down your to a point just above your knee.
Pass the rope behind your leg…
Reverse tension, simple form – Under-Over or Over-Under
Pull the tail under the stem.
…
…
Reverse tension, keeping the tail above the incoming line (closer to your hips). … So that was Under-Over.
There is very little holding this in place. Just tension. If the loop is tight, it will stay in place. If it is loose so the loop can get larger, it might work its way up your leg if you move around. Let’s add a little friction so it stays in place better.
Reverse tension, adding a twist – Over-Under-Over
If you start with Over-Under, you can add the twist but still only need one tail pull!
Go around your leg again, this time laying the tail on top of the stem.
Put your finger under the stem but on the incoming side (closer to your knee).
Hook the tail under the stem again…
Reversing tension, but with and Over-Under approach.
Now lay it on top of your incoming line. So with one more move – now Over-Under-Over – you have added a twist and a little friction. This has allowed you to revers your tension and will hold just a little better.
Go around your leg again.
Crossing Hitch – Over-Under-Over-Under
Connect firmly to the stem, but then continue on (forward tension, instead of reverse)
Again, go over the stem.
Reverse tension, keeping the tail *above* the incoming line (closer to your hips).
Remember: When doing a Crossing Hitch, you do the first tail pull on the same side that you want the rope to travel after the Crossing Hitch is completed.
Now run it over the incoming line…
Up to this point, this is just a mirror image of what we did last time, but now…
… go under the stem again …
…
This is the completed Crossing Hitch, created “Over-Under-Over-Under” just one more move than a twist…
Munter Hitch – Over-Under-Over-Under-Over
Connect firmly to the stem, but reverse tension. This version is kind of ugly, but it has one powerful use.
Go around you leg again. Do another Cow Hitch, but with the first tail pull on the other side (closer to my knee)…
This lets you practice doing Cow Hitches both ways, letting you tie more smoothly the more you drill.
…
…Cow Hitch complete. Now with one more move…
! (Making this “Over-Under-Over-Under-Over” if you have been keeping track)
This is the Munter Hitch.
This is rarely used in creating ties and harnesses, but is very commonly used as a Suspension Friction. This can allow a rigger to lower a suspended person to the ground quickly and with great control, even if that person weighs much more than does the rigger! See the Suspension Munter tutorial for more!
Cow Hitch – Over-Under-Over-Under-Over-Under
Connect very firmly to the stem, but reverse tension. This one is nicely symmetrical and attractive.
Go around the leg again. Then repeat the same set of moves you have been practicing: Over the stem, then hook the tail -- this time below the incoming line because with a Cow Hitch, you want the first tail pull on the *opposite* side from where you want the tail to travel with the knot is complete – then run the tail
Under the stem to reverse tension, then Over the incoming line to complete the Twist, then…
Under the stem again to complete the Crossing Hitch.
If I was going to go directly to the Cow Hitch I would keep this loop open like I am showing here in the picture so I could immediately go to 31 below, but to make a point…
If I just reversed tension here like this, I would have the Munter Hitch, but instead…
… I protected that loop from closing.
This means I can hook the tail and pull it through that loop like this. Notice how I am pulling toward the left side of the picture. That is keeping tension on the Half Hitch on that side of the knot. That, in turn, is keeping the passage open, the knot does not collapse on the tails as I am moving them…
… allowing me to smoothly guide the ropes through a passage that is larger than is needed.
Once you complete that Half Hitch…
… Pull the tail to tighten it.
Dress the knot. The completed Cow Hitch should look like this.
Structurally, this is the same as Lark’s Head (a Lark’s Head made with two strands, that is). It has a different name because the method used to construct it is different. With a Cow Hitch you tie it on step by step instead of pulling the tail through the bight.
There you are! A full set of junction drills! Each connection on this line only takes one more move than the one before it!
By the way, you can do this drill standing just as well!
Using the Quick-Release
To reset, go to the knot you made at the beginning.
Untie the bight…
…
…and then pull the rope out of all the knots ...
…
… for a quick-release!
Comments
Loading comments...
Sign in to leave a comment.