
Demi-Hitches
By Lazarus Redmayne
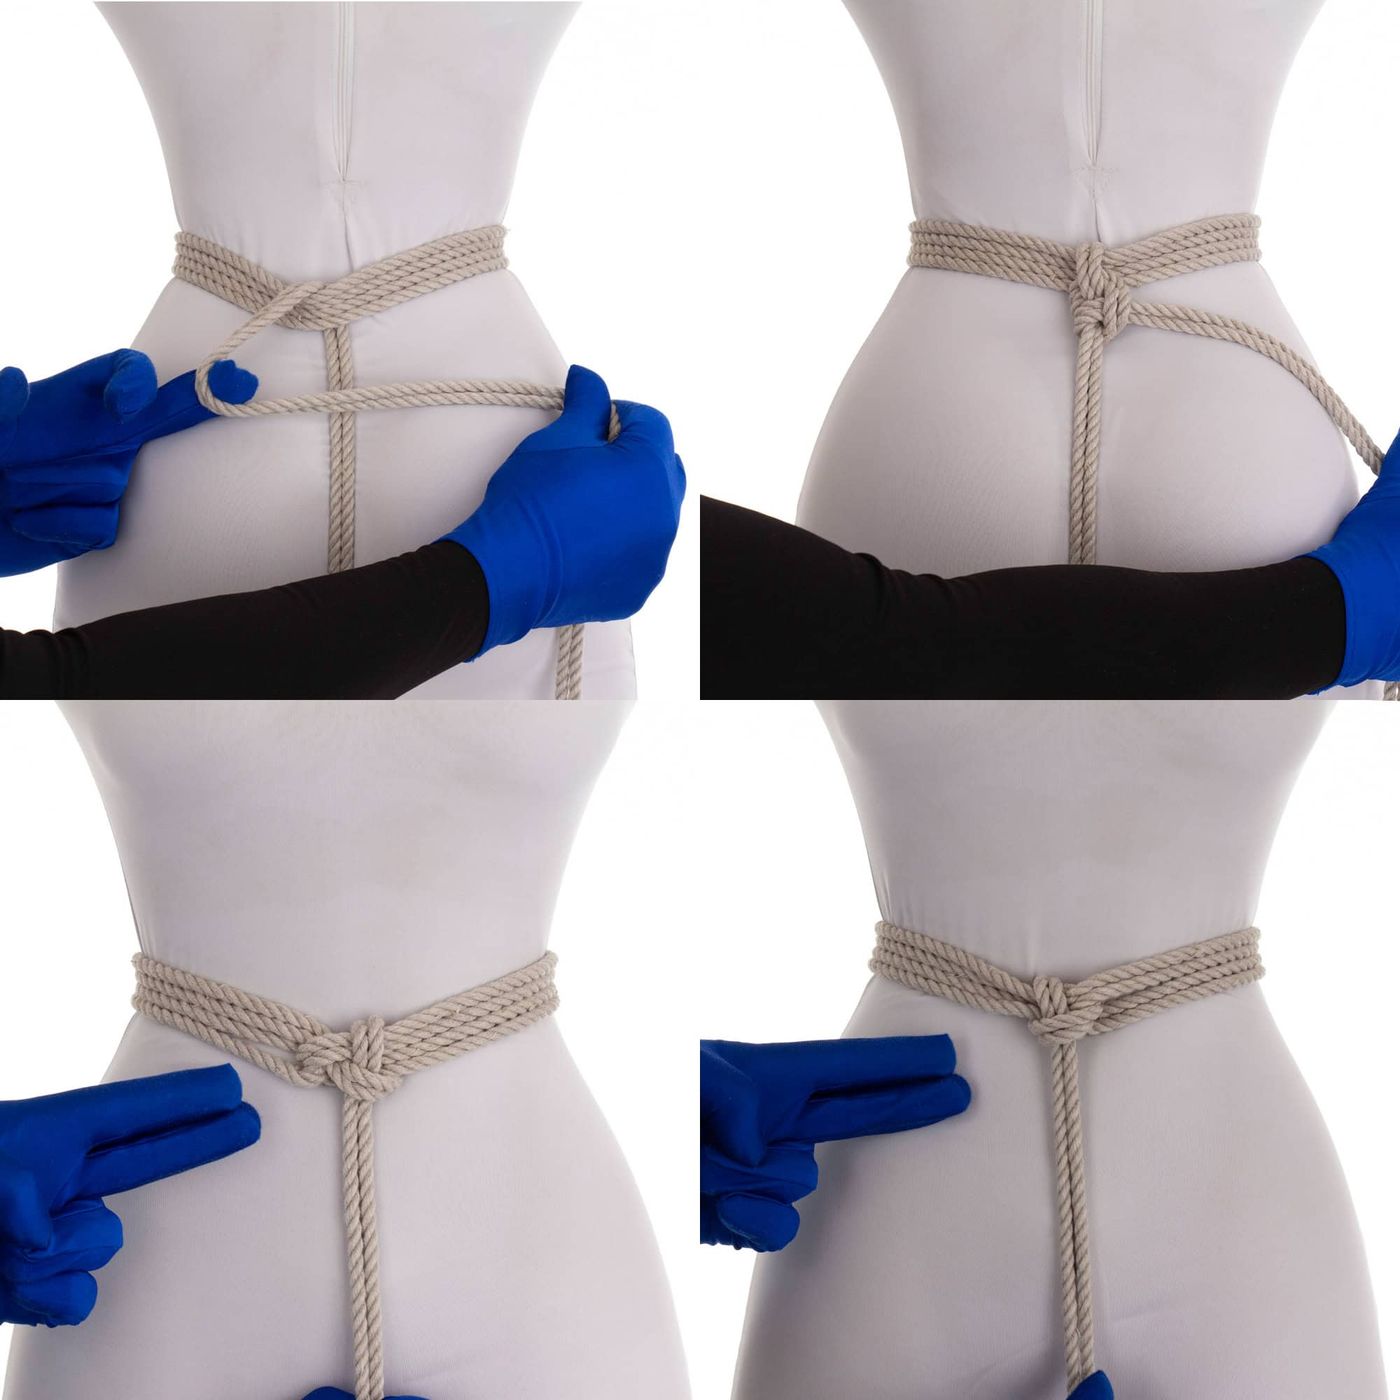
The Half-Hitch, just a single wrap of rope around an object, is a basic building block of many other knots. It is commonly used on its own to lock off a part or the end of a bondage tie. It can be used to attach the free end of a rope to some object.
Pros: It is fast and can be slipped for easy removal.
Cons: This is a sliding knot and will collapse down if used for dynamic tension. It will also bind while under tension. You need to reduce/remove tension to untie it. Therefore, this knot should never be used directly on a human and should not be used to anchor a suspension.
Rope Needed
For this tie, I used one 15' (~5m) piece of Natural 6mm (1/4") hemp provided by my affiliate Twisted Monk. Check them out for some amazing hemp rope!
The Half Hitch - What it is, one important use and how to tying it smoothly!
Tying a Half Hitch is quite straightforward, but there are a few tips and tricks to incorporate good rope handling skills to make tying one much smoother. Mastering basics like this make it seem to others that you move rope like a natural extension of your will. This will boost their impression of your ability and increase your rigger cred. 😉
To see this in action, watch the video. You see 1 thing … I’m doing 15 things!
Video Contents:
- 00:10 - A key use of the Half Hitch
- 00:54 - It’s deceptively simple! I am doing 15 things. Here are the details
- 01:55 - Let's count those out!
In the video, here is what I am doing at each number:
- Run the tail through the bight or around something
- Reverse tension.
- Hold the tail with one hand (Hand 1). Place it tail at an acute angle to the incoming line.
- Place the fingers of your other hand (Hand 2) on top of the tail, then…
- …under the band you are tying to.
- Using Hand 1, place the tail on top of the band you are tying to. (Notice how it makes a “4” shape.)
- Grab the tail with a scissor grip or hook it with your fingers of Hand 2.
- Pull the tail through to the other side of the band and…
- …immediately pull it against itself (against the Half Hitch that you are tying). This keeps the large hole open, allowing you to more easily pull the tail through.
- Use Hand 2 to begin pulling the tail through the hole.
- While doing that (10), use Hand 1 to guide the tail smoothly through the hole so that the tails don’t end up flailing around and potentially striking something or someone.
- Pull the tail fully through the hole. Hand 1 continues to guide and control the rope until the ends are complete through.
- Transfer the tail to Hand 1.
- Move Hand 2 to the bight and hold that node so that rope cannot slip through it. This keeps the incoming line under tension so that it remains tight while you…
- Use Hand 1 to pull the tail toward the node to complete the Half Hitch.
Locking to a Hard Point using Two Half-Hitches - Video
Locking to a Hard Point using Two Half-Hitches - Pictures & Text
This is one of the fastest and easiest ways to lock a tail off to a hard point. Perhaps you want to tie a cuffed wrist or ankle to the bed posts, or maybe to some overhead hard point. There are many ways to do that, but learn this one and then grow from there...
I recommend learning to tie this friction using either hand and when tying to something horizontal or vertical.
Important Safety Tip! This example shows a wrist being attached to an overhead point here. Wrists are sensitive, they must be handled with care.
- They have a lot of nerve and blood vessels near the skin on the inside of the wrists. Too much pressure there can impact blood flow or nerve conduction. Cuffs should never be too tight; you should always be able to run two fingers under a cuff.
- The wrist joint itself is also fragile. If you pull on wrists too hard, you can damage that joint or even push some of those small wrist bones into the wrong position. NEVER suspend someone by the wrists alone. Never tie someone in a position where rope is a applying heavy continual stress on the wrists.
- In this example below, the tie looks too tight up on my partner's wrist. This was done during filming for dramatic effect, but a member wrote me to rightly point that that readers might get the wrong idea. You would never want to have an overhead tie actually be as tight as this appears to be. In reality, my partner had several inches of slack when the tie was complete. They were able to move their hand around to adjust how the ropes of the cuffs lay on their skin. They were also able to grab the tail for additional support. You want to make sure they have enough room to make adjustments like that.
Grab the tail.
Run it over top of (or around) your hard point.
Pull the tail to adjust the desired position/tension.
Now you have mechanical advantage, you can adjust a bit more forcefully if that is your thing, but be sure you keep safety in mind. Don’t put too much pressure on area of the body that should be protected.
Place your fingers in front of the tail but behind the tight standing line.
Feed the tail to your fingers.
Begin pulling the tail through the loop and immediately slightly down toward your partner. This will help keep that first Half-Hitch open for the moment and make pulling the rest of the tail through much easier.
Pull the tail all the way through but keep tension on it while…
…you reach up with your other hand and put pressure on the rope where it goes around the hard point.
Keep pressure there so that the standing line stays tight while you pull the tail quickly and firmly toward the hard point, “snapping” it closed.
It should be tight against the hard point like this.
You can now remove your hand but keep tension on the tail.
The first Half-Hitch is complete, but this is not enough to hold the rope firmly in place, you need a second one.
Repeat what you did before: Place your fingers in front of the tail, but behind the standing line.
Feed the tail to your fingers.
Begin pulling the tail through the loop and immediately down toward your partner to keep the Hitch open for the moment.
Pull the tail all the way through. Keep continual tension on it while you reach up with your other hand and put pressure on the rope where it goes around the hard point.
Keep pressure there so that the standing line stays tight while you…
…pull the tail quickly and firmly toward the first Half-Hitch
It should be tight against the first Half-Hitch like this.
This is now the completed and locked “Two Half-Hitches” friction. If you are using slippery rope (rope with low “tooth” like nylon), you may need to add a third Half-Hitch
Use up the extra rope.
If you happen to be tying to a bedpost, you can simply drop the rope on the floor. If for whatever reason you want to use the rope up in the tie itself and you have a lot of rope leftover, you could run it all the way down through the cuff and then back up to the hard point again to consume rope quickly and then tie off the end however you like once you run out of rope. (For better security, tie off on the hard point side, not the cuff side, out of reach of fingers or teeth.)
Locking off a strap or *to* a strap with a Half-Hitch - Video
This Video Includes:
- Locking a strap with a Half-Hitch, reverse tension style
- Locking a strap with a Half-Hitch, forward tension style (1:50)
- Locking off *to* a strap using Two Half-Hitches (2HH) (3.17)
Locking off a strap with a Half-Hitch, forward tension style - Pictures & Text
When locking off a band or strap of rope, you can use a Half-Hitch on either side of the junction point. In this case I am going to do it on the side in which the tail is already naturally flowing. This is called “forward tension”. If I were to reverse the direction of the rope and lock off on the other side of that would be called a “reverse tension” style. See the section below to see how that one is done.
This version features an attractive triangular pattern and is less bulky. It does, however, take a bit more practice to get the lines making up the strap to have even tension. So be sure to practice it.
We’re going to be locking off on this side, the direction that the tail is already naturally flowing
Place your fingers underneath the strap
Protect a bit of the tail so that it doesn’t get pulled through while you…
…grab the tail and…
…use your finger as a hook to pull the tail underneath the strap
(Step in progress)
Pull the tail all the way through except for the small loop that you’re protecting
Reach through the loop you have been protecting
Grab the tail
Use your finger as a hook to pull the tail through
Maintain tension on the rope as you’re pulling it through so it doesn’t flail around and pull the tail all the way through
Place one hand underneath the strap so that you can feel all the ropes
Lightly grip the ropes and…
… adjust the tension so that you have the same level of tension in all four strands. Then grip those strands much more tightly so that the tension is maintained while you lock off the rest of the knot in the next few steps
Now grab this part of the knot and pull upwards…
…like this.
Then shift the hand that is underneath the strap to put a finger behind the ropes that you have just tightened to keep them in place while you then pull down on the tail…
…to complete the Half-Hitch
I personally prefer this version over the reverse tension Half-Hitch because I find this triangular pattern quite attractive.
Locking off a strap with a Half-Hitch, reverse tension style - Pictures & Text
When locking off a band or strap of rope, you can use a Half-Hitch on either side of the junction point. In this case I am going to reverse the direction of the rope and lock off on this side. This is called a “reverse tension” style. If I were to do it on the side in which the tail is already naturally flowing, it would be called “forward tension” style. See the section above to see how that one is done.
This version adds more friction in the knots which makes it easier to keep even tension in the lines making up the strap. But the downside is that it is a bit bulkier and a little less attractive (IMHO)
We’re going to lock off this band with a Half-Hitch around this side, opposite the direction that the rope would naturally flow
Reverse the tension
We want the tail of this rope to naturally flowed downward when we are done, therefore…
…we have the tail on the downward side before we start making our Half-Hitch
Reach under the strap from above
Grab the tail.
With your other hand protect a little loop of that tail while you use your finger as a hook to pull the rest of the tail underneath the strap
Pull the tail all the way through
Reached through that little loop you have been protecting to grab the tail
Pull the tail through the loop.
You will note that the rope looks straight as I’m pulling it through. This is because I am holding the other and with my hands so that I can move the rope through this loop as if the rope was one solid straight line.
Like this.
Once the end of the rope is ready to be pulled through the loop, I let go. Moving rope alike of this reduces the overall friction on the rope and gives you a greater control over how the rope is flowing and therefore you will be less likely to accidentally hit your partner with flailing ends. This really contributes to the overall professionalism of your presentation and shows you to have greater skill
The overall form of the Half-Hitch is now done and we just need to tighten it properly
Grab this part of the tail
Then place your fingers behind the junction so you can feel how much tension is in each strand of the strap
Close your thumb on top of the junction points and then using your other hand, adjust the tension so that it is even across all four strands
Maintain that tension and then move your thumb out of the way for a moment while you reverse the tension on that rope again…
…then clamp your thumb back down on top of it to maintain that tension in the strap…
…while your other hand grabs the tail…
…and pulls it downward…
…and then into the knot to tighten the Half-Hitch
Done! Now the strap is locked and the tail can be used to do whatever else you have planned
Locking off *to* a strap using Two Half-Hitches (2HH) - Pictures & Text
2HH used to attach a rope to a rope belt. (Inverted Technique)
This version is upside down from the one shown in locking off to a hard point. In that version (which is faster), we ran the rope up in front of/over the hard point as the first step before doing the Half-Hitches. In this version, we run it behind first. While the first version is faster because there are fewer tail pulls, there are sometimes reasons you want the standing line running up behind the thing you are tying to.
I have just run this line between my partner's legs and I want to lock it off to this strap
Place your finger underneath the strap
Hook the tail with your finger
Draw the tail underneath the strap using your finger as a hook
Holding the end of your tail, continue moving your hook upwards, moving the rope underneath the strap…
…until the line is all the way through
Hold the cords of the strap with one hand see you keep them from bunching up
Then add tension to your tie. In this case, this means pulling up on that tail and down on the strap
Maintain the tension and then reverse the direction of the tail down over top of the lines of the strap this will now hold them in place and maintain that tension and we just need to lock it off
Now we’re going to be making this shape with the rope … but I’m going to do with a slightly different way
You may hear this called this the number “4” technique (or the “P” technique if you do with the other direction, see Step 22)
I placed my fingers on top of the tail and then underneath the centerline. You can’t entirely see the “4” because my fingers are covering part of it but it is still there
Grab the tail with those fingers
And draw it under the centerline
Using your finger as a hook
And then moving the rope all the way through
Maintain tension on it all the time that you were pulling it through and after you’re done as you see me doing here
Now with your other hand, reach underneath the band and hold the band and the center line in place (maintaining the tension) while you pull the tail around to tighten it
Like this
To fully lock off a line to a band you need at least two Half-Hitches so let’s do another one. We will do this one the other direction. Reach under the centerline
Grab the tail
Protects the loop from closing with your other hand and pull the tail underneath the centerline
And all the way through. You can see in this picture why this would be called the “P” technique
Reach through that loop you were protecting
Grab the tail
Hook the tail through the loop
Pull the tail all the way through
And then pull it tight to lock it
We have a little rope leftover in this case but I discuss how to use up rope in other tutorials so I won’t go over it here
(You could do a wrap around the waist, or if the rope is shorter, wrap it around the belt itself...)
Locking off *to* a junction using a Half-Hitch - Pictures & Text
When there are multiple lines coming into a lock off point, you can often “lock off” your tail with a single Half-Hitch. Here is one way of doing that
I have a tail and I would like to lock it off to this junction
Run the tail over top of one line
Then reach your finger underneath the strap
Hook the tail with that finger
And use that hook to draw the tail underneath the strap
Pull the tail all the way through new line
Reverse tension
Reach behind the centerline
Grab the tail
Using your other hand…
…protect a little loop of that line as you draw the tails behind the center lines
Reach through that loop you have protected
Grab the tails
Pull them through
Tighten
If you have a little bit leftover you can use it up by running it under the strap
Reach under the strap with a finger and hook the ends
And draw them under.
If you have little knots in the end of your rope like I do…
…you can use those knots in between strands of rope to do a final lock off
Reach underneath a strand or two
Grab the ends
Pull them through
An alternative demonstration of locking off *to* an anchor point using Two Half-Hitches (2HH) - Pictures & Text
Core technique applied to a pole.
Typically you will be tying off with two strands, but I am showing it with one for clarity of the core technique.
Loop the free end around an anchor point. (In this case I am tying off to a pole.)
Circle the center line, tucking the free end underneath the loop you just made
...tucking the free end underneath the loop you just made
Then, continuing around in the same direction as is naturally flowing, go around the standing line one more time
Again tuck the end under the loop you just made as shown.
Tighten to complete
To “slip” the knot, making it easier to undo (Read: less secure), tuck a bight through last loop instead of pulling the end all the way through.
Tighten to complete
Comments
Loading comments...
Sign in to leave a comment.