Ball Ties - Core
There are *many* ways to tie your partner into a ball. This tutorial shows you over 1600 of them…
Core Ball Ties
There are *many* ways to tie your partner into a ball. If you were looking for a tutorial that walks you through tying your partner into a ball tie using one particular step-by-step pattern, check out Ball Tie - Example 1.
This is more of a course than a tutorial. It guides you through a process of tying your partner into a ball, breaking things down into various stages and presenting various options and choices that you might pick at each stage. If you calculate the combinations possible using just the options below, there are over 1600 different ways to do a ball tie! …and yet this is not a comprehensive list of all possibilities; there are many others. But this should be a great starting point to inspire your own creativity!
Read through this whole tutorial first to get a sense of the possibilities before you begin.
Core Ball Ties Safety
- Risk of Positional Asphyxiation
- - Ball ties can be very restrictive. If you make them too tight they can impact your partner’s ability to breathe. This is a bad There are two factors here that need to be managed. (1) The tightness of any strap around the chest. This can restrict chest movement and impact breathing. (2) The curled-up position of the body, a position that restricts the movement of the abdominal muscles. If both of these factors are too strict (tight), it can make breathing difficult or even impossible. Start easy. Don’t make either strap of the chest harness too tight (it should be a gentle hug) and make the ball you tie your partner into loose when you first try this. Test what your partner can safely handle and build intensity over time. Be sure to keep clear communication and, if they report any trouble breathing, immediately release the strap that cinches them into a ball, the one that keep the knees tight to the chest.
- Risk of Injury (Arms)
- – This tie can be incredibly restrictive. So much so that the subject can be made almost entirely unable to move themselves. This means that, if their arms are tied around their legs and they are then tipped on their side, they will be laying on that arm and be helpless to move themselves off it, unable to relieve the pressure of their body weight on that arm. This can lead to unwanted pain or injury if left too long. If you find your scene has gone in this direction, move your partner into different positions periodically to manage this impact.
- Risk of Injury (Back)
- – This position can put stress on the back. If left in this position too long, your partner may experience strain or stress to the muscles or other soft tissue in their back. Have them stretch first. Limit the amount of time your partner is in this position until you understand their tolerances. Keep clear communication. Don’t push too far, too fast.
- Risk of Injury (Neck)
- – This risk applies more to a variant that you may have seen pictures of online. In variants that run a rope around the back of the neck instead of over the shoulders or back to hold them in a ball. In this position, the rope across the back of the neck may be pulled too tightly and/or remain tight for too long. This runs the risk of moving the cervical vertebrae in a way that can cause pain or injury. We do not recommend this variation as we consider it to be too risky for our taste. That is why we don’t include that option in this tutorial.
For this tutorial, I used various 30' (~9m) and 15' (~5m) pieces Natural 1/4" (6mm) hempI use an amazing Natural hemp rope provided by my affiliate Twisted Monk. Check them out!Prerequisites:
Open each section in turn and choose one of the options … or skip that layer if you want. You do you!
You don’t have to have a chest harness, but if you want one, put it on first. A harness can be helpful as support or a tie-off point for upcoming layers.
Safety: If you do decide to have a chest harness or chest strap, don’t make it too tight. Have your partner take a deep breath before you set the tension in each strap. That way these straps will be less likely to impact their ability to breath later on.
Do you harness the chest only? ...
If you decide to include a chest harness, do you want one that puts straps around the chest only? That will give you more options later when deciding where to place the arms. You can even change arm placement mid-scene if you choose this option.
- Shinju
- Bikini Harness
- Lark’s Head Single Column around the middle of your partner’s chest, at the sternum level, as long as it cannot slide up – this will be dictated by the build of your partner.
... Or tie the arms as well?
But you can also decide to use a harness that captures the arms now. Or perhaps you are in mid-scene and they are already in such a harness. Well, you can convert your scene to a ball tie scene with that as the starting point. If you capture the arms now, skip Layer 4.
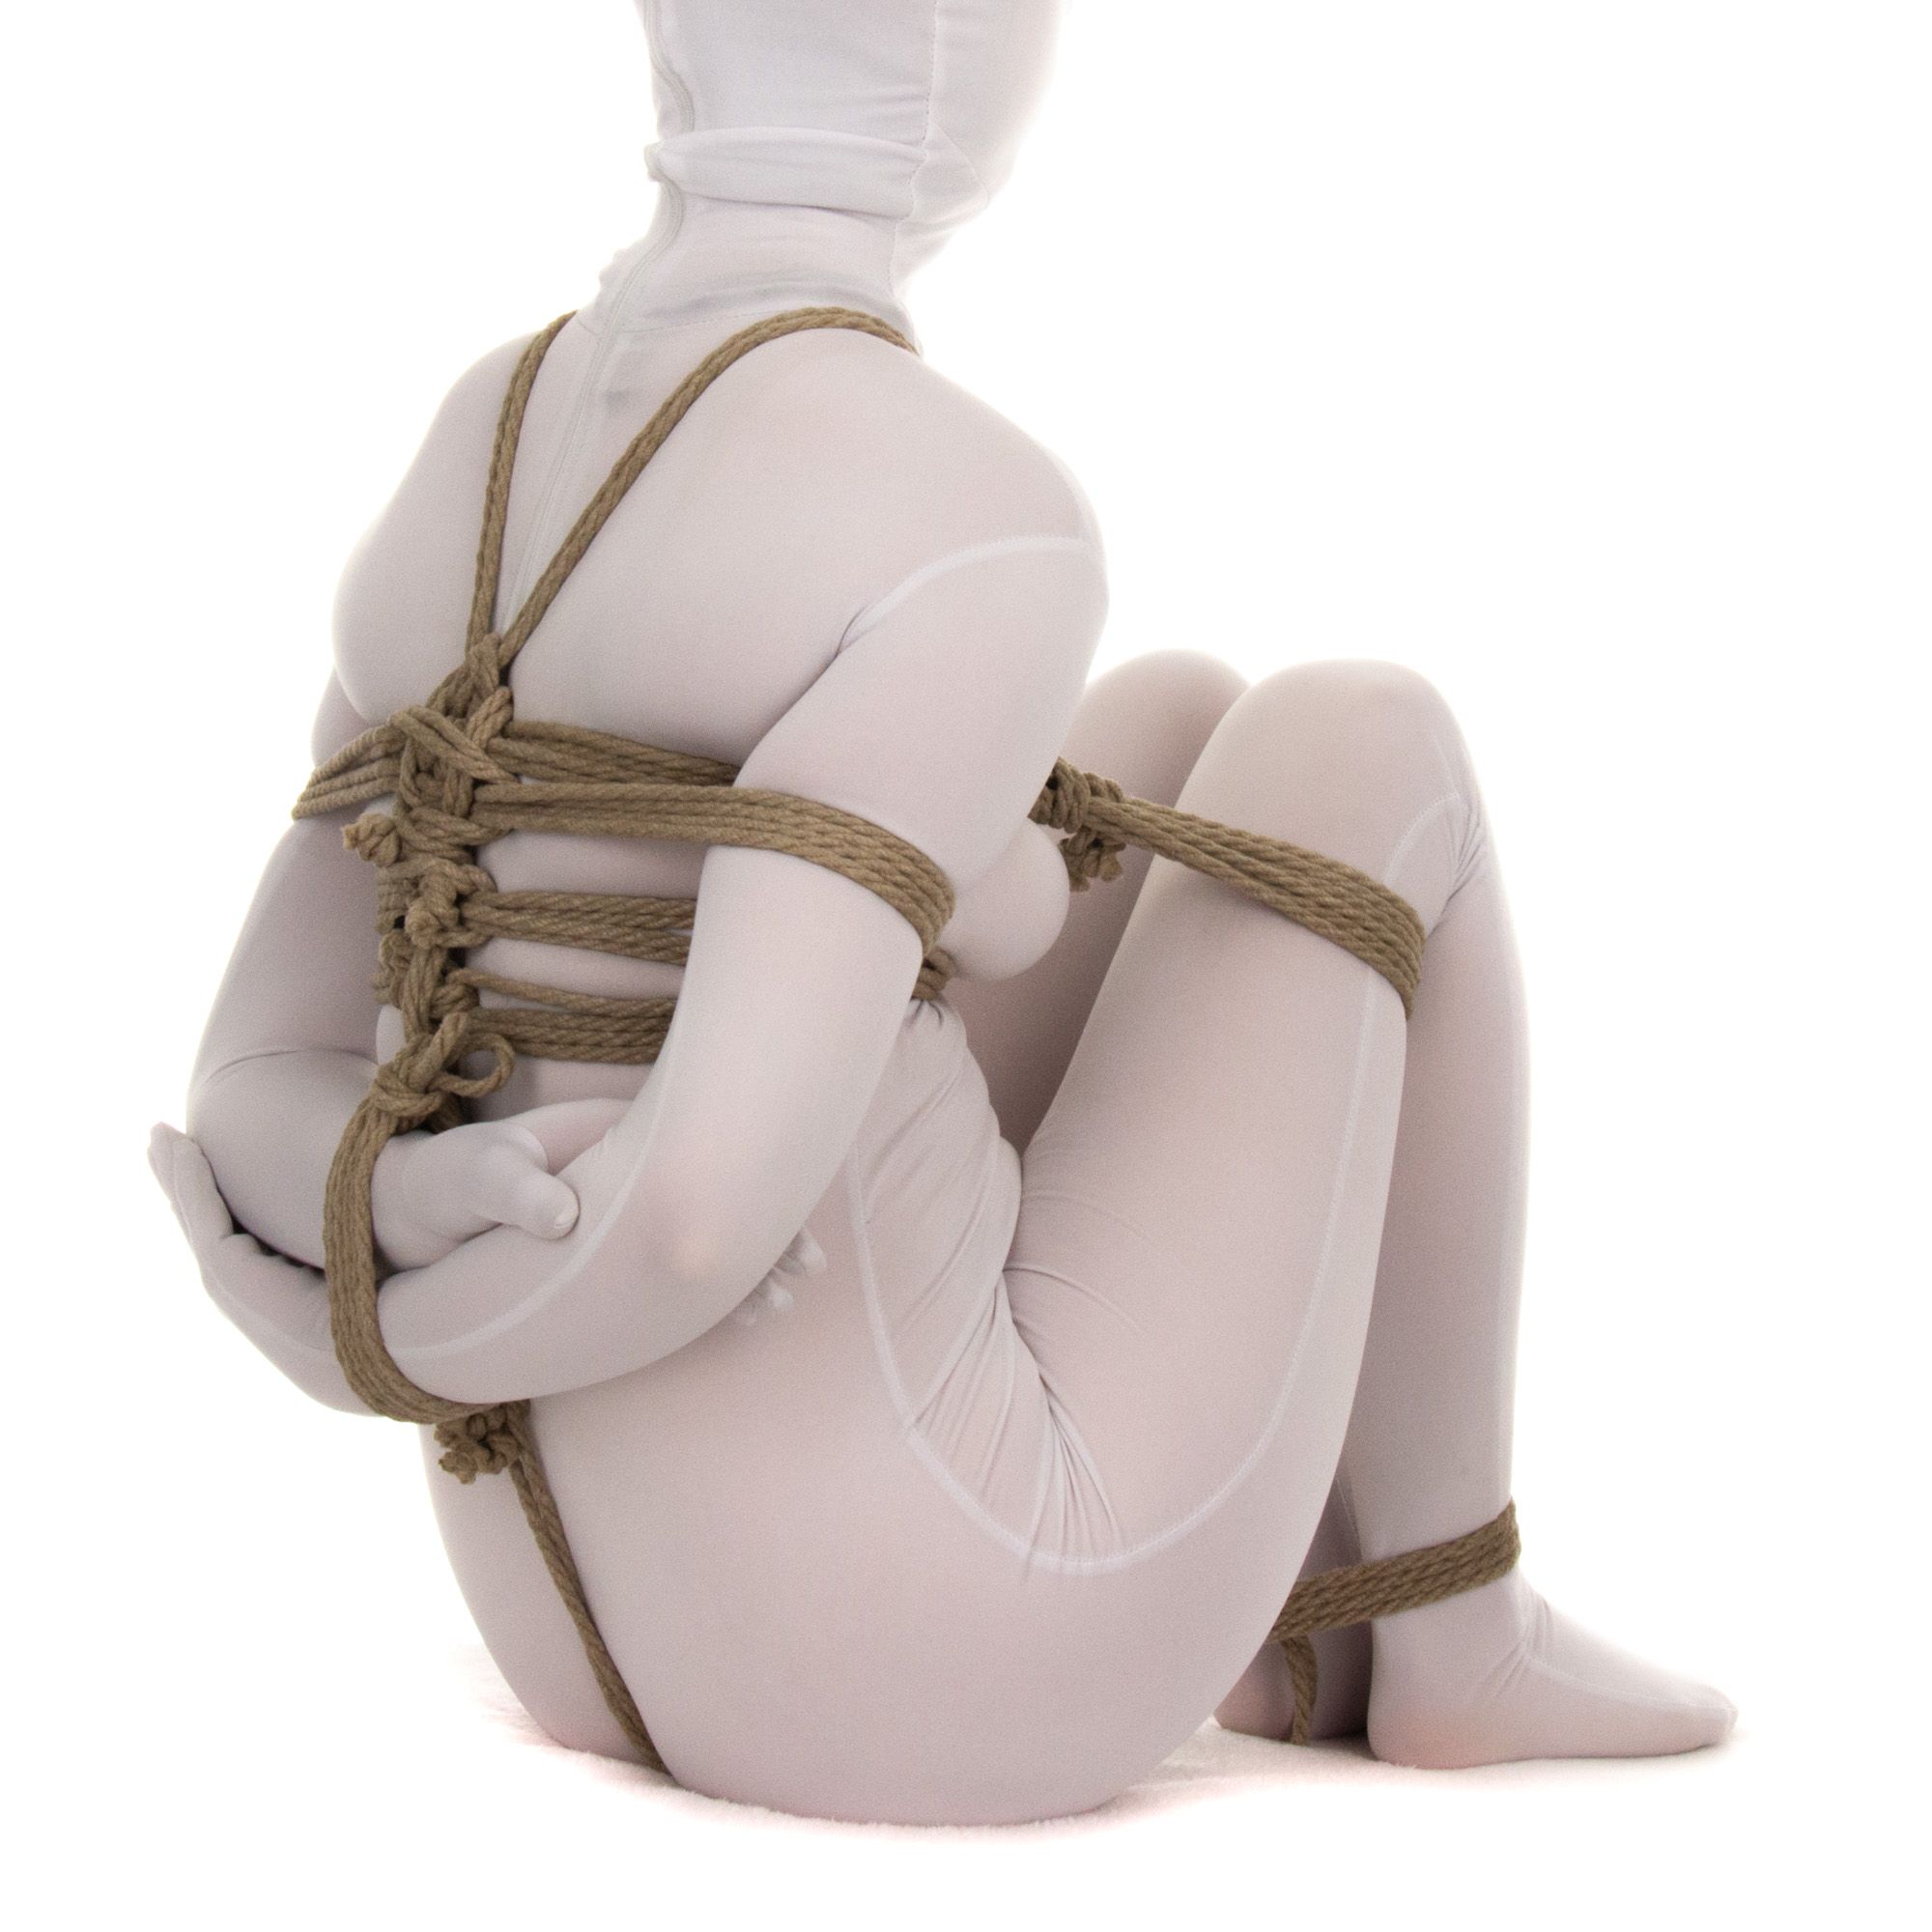
For purposes of this tutorial, I will show options with no chest harness and options using the ShinjuClassically in a ball tie, the knees are together and are parallel, but there is nothing wrong with changing things up! Here are a few options to consider.
Note that you want any strap to be 1.5-2” (3-5cm) away from the knee joint so that that rope is laying on top of thicker muscles to help protect the nerves and blood vessels underneath.
You want the bonds around the legs to be somewhat loose. When you later bend the leg further (like when tying the ankles to the body or wrists) the muscles will move into shapes that will make the strap tighter. You need to compensate for that now or it will be too tight later, which might limit the length of your scene. You will need to practice this with your partner to get a sense of the right level of tightness/looseness.
Important Safety Note: This element--whatever actually holds your partner in that ball position, that strap or straps that keep them folded in two--is the part of the tie that controls how strict and challenging it is. It is that folded position that constrains the abdominal muscles and can make it difficult to breath. If your partner is in distress, untie or cut this part first and they should have instant relief.
If you want the knees together...
Knees Together, Option 1 - No Chest Harness - LHDC connecting knees to chest
Place a Lark’s Head Double Column around the knees and chest, with the cinch going between the body and knees
Knees Together, Option 2 - No Chest Harness - LHSC + Strap
Place a Lark’s Head Single Column around the thighs (above knees), somewhat loose, then connect it to the chest with a strap created either with the tail of the LHSC or with a new rope.Once you have the knees tied, strap that cuff to your partner’s upper back:Note: You can do this around the upper thighs as well if you want two bands holding the legs to the chest. If you plan to do so, though add both SCs before you cinch either to the chest. This is a *very* challenging position and should only be done with someone with insane flexibility. Test/practice this with the person before using it in a scene.
Knees Together, Option 3 - No Chest Harness - LHDC + Strap
You can do exactly the same thing as above but starting with a Lark’s Head Double Column! Just add a new rope to the LHDC using a Lark's Head and then connect the LHDC to the chest with a strap just as shown in Option 2 above.
As with the above, you can do this around the upper thighs as well if you want two bands holding the legs to the chest. If you plan to do so, though add both DCs before you cinch either to the chest.
Knees Together, Option 4 - Chest Harness - Add a strap to trap the knees
Connect a new rope to the upper band of the chest harness, then use it to make a new strap holding the knees to the chest.Note: You can double this up with a second strap connected to the lower band of the chest harness. This is a *very* challenging position and should only be done with someone with insane flexibility. Test/practice this with the person before using it in a scene.
Knees Together, Option 5 - Chest Harness - Start with ankles to thighs, then add a strap
Take a two-stage approach as shown in Ball Tie - Example 1. Tie the ankles to the upper thighs, and then create a strap binding that cuff over the shoulder to the back of the chest harness. See the Ball Tie - Example 1 tutorial for for step-by-step instructions on this approach.
If you want the knees apart...
Knees Apart, Option 1 - With or without a Chest Harness - Malasana
Tie your partner's knees up near their shoulders with the Malasana tie.
Knees Apart, Option 2 - With a Chest Harness - LHSC on each knee
Tie a Lark’s Head Single Column around each knee (somewhat loose), then run the tail to the back and tie it off to the chest harness however you like.Here is one possible way tying off the tails. There are many others.
Knees Apart, Option 3 - With a Chest Harness - Create a general strap encasing both chest and legs
Connect a new rope to the back of the chest harness and then run it around the chest, catching both knees, but not cinching them together. Create a strap. This will basically be a Lark's Head Single Column around the upper chest and thighs. This is most useful if the ankles are tied apart or in a crossed position as discussed below.
(There is no picture of this at this stage, but you can see this general idea in practice in Layer 5 below.)In a ball tie the ankles are classically tied together and are parallel, but you can mix this up as well!
If you want the ankles together...
Ankles Together, Option 1 - Ankles parallel and tied together
Tie a Slipped Somerville Bowline or your favorite Double Column around the ankles. Leave it a little loose.Then either (1) don’t connect the tail to anything just yet (use up the tail in some other way) because you will tie the ankles close to the body later using the tail from the wrist tie, or (2) position the ankles as close to the butt as you wish, run the tail under the butt and connect it to a strap in the back.
Safety Note: Take care as you are doing this. This will make the thigh muscles contract and grow larger. If the straps you tied around the knees/thighs were tight, that will limit how closely you can move the ankles to the butt without causing issues. Keep good communication with your partner. If they report any “weird” sensations in their legs or ankles, loosen things so that the ankles can move away from the butt.
Ankles Together, Option 2 (If knees are apart) - Ankles crossed and tied together
Tie a Slipped Somerville Bowline around crossed ankles. Leave it a little loose. This version has the form of a tie called the “Ebi”The tail could then be tied over the shoulders to a strap in the back. Like this:
If you want the ankles apart...
Ankles Apart, Option 1 - Umm, don't tie them at all...
Firstly, there is nothing to say that have to be tied. I guess you could argue that it isn't really a ball tie if the ankles are not part of the ball, but it can be great fun to watch your partner try to move around with everything bound into a ball except their ankles.
For example, connect their knees to their torso and then bind their arms and wrists into that package (either behind the back or under the knees). Their feet then sick out like little paddles, allowing them some limited movement. Now chase them around with a paddle or crop until you both devolve into fits of laughter...
Ankles Apart, Option 2 - LHSC on each ankle
Tie a Lark’s Head Single Column around each ankle, the tail then run around the hips, pulled tight and tied into the back of the chest harness.Here is one possible way tying off the tails. There are many others.If you did not choose a harness in Layer 1 that has already trapped the arms, now is the time to get them under control! Using your preferred Double Column and Single Column, explore lots of fun options! Mix and match the below, or try different options in different scenes.
If you want the arms in the front...
Arms in Front, Option 1 - With knees together - LHSC on crossed wrists
Have your partner cross their wrists. Tie them using a Lark’s Head Single Column or Somerville Bowline. Then run the tail to the back and tie it off to the chest harness however you like.
Arms in Front, Option 2 - With knees together - SC on each wrist
Tie a Lark’s Head Single Column or Somerville Bowline on each wrist. Then run the tails to the back and tie them off to the chest harness however you like.
Arms in Front, Option 3 - With knees apart - LHDC on parallel wrists
Tie your partner's wrists using a Lark’s Head Double Column. Then run the tail to the back and tie it off to the chest harness however you like.
If you want the arms in the back...
Arms in Back, Option 1 - LHDC on parallel wrists
Tie your partner's wrists using a Lark’s Head Double Column or the like. Then run the tail between your partner's butt cheeks and tie it to their ankle cuffs. This can be a sort of predicament; if they want relief on their ankles, they pull their wrists and vice versa.
Arms in Back, Option 2 - Box Tie Style - Just Wrists
Have your partner put their arms in the Box Tie position and secure the wrists with a Slipped Somerville Bowline using a shorter rope. Then run the tail up to the upper chest strap and tie it off however you like.
Arms in Back, Option 3 - Box Tie Style - Wrists & Elbows
Start with Option 2, but use a long rope. Use the extra tail to secure the elbows like you would in Gote Shibari / TK.
Arms in Back, Option 4 - LHSC on each wrist
This option can be great if a person has different flexibility in each arm!
Tie a Lark’s Head Single Column or Somerville Bowline onto each wrist, then run the tails up to the upper strap of the chest harness. Adjust the position of each wrist as desired, then lock off.At this point your partner is probably pretty wrapped up. But maybe you feel they just need that one more element to ... tie things all together.
So, what do we do? Why, add more straps of course! Perhaps one more big hug around the whole neat package!
Extra Straps, Option 1 - Add a Single Column around the whole tie
Attach a new rope to the stem, wrap the rope around the arms, body and legs. Wrap multiple times then lock off.
Note: The way this strap is done would be quite easy to work up or down if your partner has any freedom of movement. To counter this, add some cinches to the new strap to prevent it from sliding up or down.
Extra Straps, Option 2 - Add a Double Column around the whole tie
Tie a Lark’s Head Double Column around the whole package. Make the one side contain the calves and the other the legs, arms and body...
Extra Straps, Option 3 - Add a Double Column or Extended Double Column around the elbows
If your partner is very flexible you can make this way more restrictive by tying a Lark’s Head Double Column around the elbows. If you need more room you can use an Extended Double Column instead.There is something to be said about leaving their head free. A ball tie can be so restrictive that they are barely about to move. Leaving them this one last element of freedom can enhance their frustration. It also gives you the chance to see their eyes in their growing understanding and realization of just how helpless they are. … sigh … good times…
On the other hand, this is the only thing left to them and you can very easily argue: why should you leave them any freedom at all!? Here are two interesting options, send me your ideas for others!
- Hair Tie
- Lark’s Head or Lark’s Head Single Column around mouth or eyes
Important Safety Note: Limiting how person can move their head and/or bending their neck strongly forward or backward can a safety issue. If the person does not have full joint mobility in this area, such positions can pinch nerves or cause undesired strain or stress. Discuss this with your partner and test it out before you use this in a scene. Th
Never move someone abruptly or allow them to be jarred if their head is locked in an extreme forward or backward position.Again, it is important to reinforce that these are very, very stressful positions. They can make your partner feel very helpless, but they can also if cause physical harm if used on the wrong person or if something goes wrong. Be careful. Talk about and test things first. Don’t go too far too fast.Perhaps we will make tutorials on some of these later, but for now, here are some more ideas for you to explore on your own!
There is one Example already out there for you to check out!
Concept 2
- Start with a Single Column tying the knees to the chest
- Add Double Columns to the ankles with a short rope
- Add Double Columns to the wrists and tie the tail to the DC on the ankles to finish a simple ball
Concept 3
- Restrict your partner somewhat with idea from Concept 2
- Create a weave or a web around the ball to make it more restrictive and spider-web like. Perhaps use ideas from the Spiral Futomomo and the Spider Web Harness
Concept 4
- Add your favorite chest harness or a Hishi Karada or a Heavy Elbow Harness
- Put both legs into a Spiral Futomomo
- Connect the legs to the chest harness by lacing a new rope between them. Experiment with (1) just lacing the legs to the chest element or (2) lacing the legs together and then to the chest for a much more restrictive experience!
Examples!
Now that you have ideas of what decision points exist and a few interesting options for each, go check out the Ball Tie Examples post!
The examples show various paths, choosing different options from each layer above.