
Anchor Hitch & RTTHH
By Lazarus Redmayne
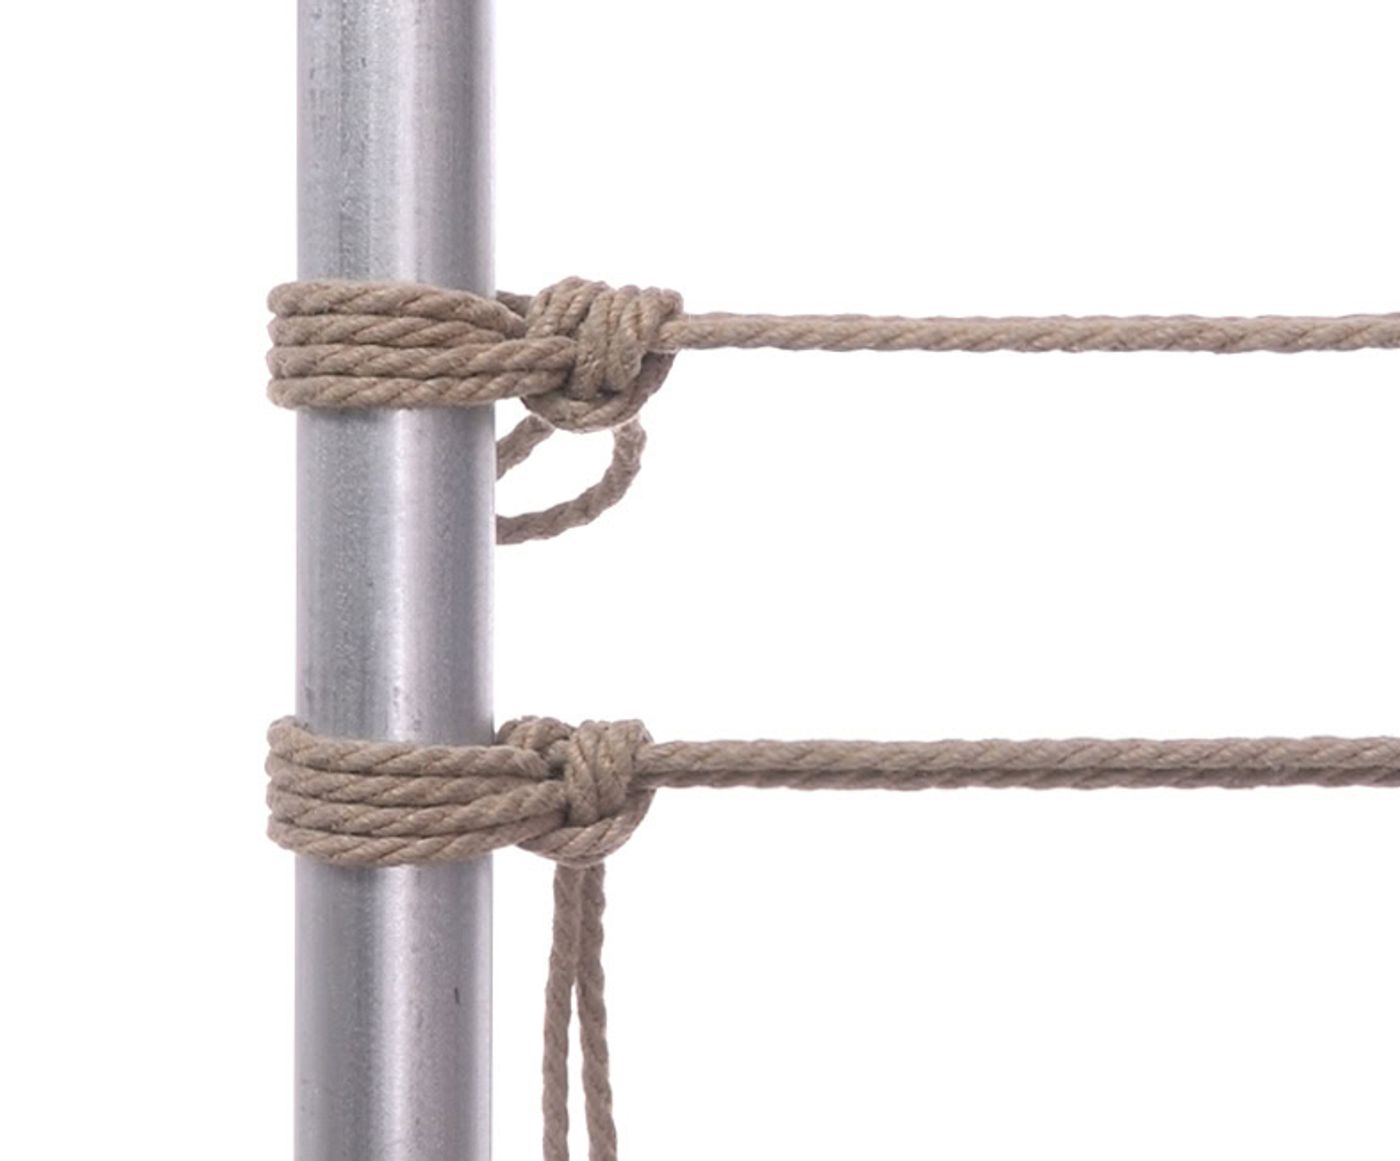
The RTTHH (Round Turn, Two Half Hitch) and the Anchor Hitch are some of the fastest and most reliable methods to quickly secure a single rope that is under tension (something is pulling on it) … a single rope or double line of rope that is being treated like a single rope as we commonly do with Eastern-style bondage.
For instance: You have a wrist, ankle, etc. caught in a Single Column and you now want to anchor the tail of that Single Column to something else … a bed post or a column, to give a random example…
No matter which hand is dominant for you, I recommend that you practice this with both your main and your off hand. That way you can run the rope in a way that makes sense for a given scene without having to mess around on the fly to figure out the other orientation…
The RTTHH is almost the same as a regular Two Half Hitches anchor, but with one extra twist that makes it more stable during the tying process.
The Anchor Hitch is almost the same as the RTTHH, but with one change where you run the first Half Hitch in a different path. This increases the stability even more, but at the cost of adding a tiny bit to the time and requiring a slightly different procedure to tighten it while not losing tension.
Risk Management and Safety
Do not use these hitches for suspensions. Frictions for Suspension Hard Points are designed to remain easy to untie no matter how much tension is added. The RTTHH and Anchor Hitch can bind (become difficult to untie) if subjected to significant tension over a period of time. So they are great for non-suspension anchoring (tying someone in a spread eagle, etc.), but not suspension.
Rope Needed
For this tutorial, I used Natural 1/4" (6mm) hemp provided by TwistedMonk.
I use an amazing Natural hemp rope provided by my affiliate Twisted Monk. Check them out!
Video
Video Contents:
- 0:24 - Two Half Hitches, the classic approach
- 0:53 - The RTTHH, Core Technique
- 1:46 - Slipped variants of the RTTHH
- 2:50 - The Anchor Hitch
RTTHH Core Technique (Right Handed) - Pictures & Text
There are a few variations below, but make sure to understand this core version first, then the variations are easy. I highly recommend you practice the Left Handed Version, too.
Find something that you want to tie…
…and something you want to tie it *to*.
Run the tail around the thing** you are tying to, starting with right-hand side.
** I am just going to all it a “post” for the rest of this tutorial.
Hand the tail off to your other hand.
Add tension to the rope by pulling the tail. If needed, you can grab the rope with both hands for added strength.
Once you have the tension set to where you want it…
…wrap the tail around the post a second time. I find it easier to wrap downward.
This is the only difference between the RTTHH and the regular Two Half Hitches. This extra wrap adds friction to the knot, which helps take the strain while you finish the Half Hitches.
Grab the tail with your left hand.
Keep the first two fingers of your left hand in place as you reach under the taught line with your right hand and grab the tail.
Continue keeping the first two fingers of your left hand in place while your right hand lifts the tail up and around the other side of the taught line.
Using your right hand, feed the tail to the fingers of your left hand.
Hook the tail through the Half Hitch.
Pull all the way through with your left hand.
Change hands so that your right hand is holding the tail.
Use your left hand to put pressure on the rope going around the post. This will keep the tie from loosening while you tighten the Half Hitch.
(In practice, this may not be necessary. If you are moving quickly, you can often get this Half Hitch locked before the rope has a chance to move.)
Using your right hand, pull the tail past the right side of the post to tighten the first Half Hitch.
Bring the tail back down into position below the knot.
Repeat Steps 6-14 a second time, exactly as before. Grab the tail with your left hand…
It is important that the tail continue wrapping the same direction for the second Half Hitch as it did for the first.
…keep the first two fingers of your left hand in place as you reach under the taught line with your right hand and grab the tail and lift the tail up and around the other side of the taught line…
…feed the tail to your left fingers…
…pull through…
…(Optionally) brace the tie…
(This is probably not needed for this second Half Hitch unless the rope and post are both really slippery.)
… and tighten.
This is the completed Round-Turn, Two Half Hitches, a.k.a. RTTHH.
RTTHH Core Technique (Left-Handed) - Pictures & Text
There are a few variations below, but make sure to understand this core version first, then the variations are easy. I highly recommend you practice the Right-Handed Version, too.
(This version of the instructions has few displayed steps. If something is not making sense, review the right-handed version of the instructions, which go into more step-by-step detail.)
Run the tail around the thing** you are tying to, starting with left-hand side.
** I am just going to all it a “post” for the rest of this tutorial.
Hand the tail off to your other hand. Add tension to the rope by pulling the tail.
Once you have the tension set to where you want it, wrap the tail around the post a second time. I find it easier to wrap downward.
This is the only difference between the RTTHH and the regular Two Half Hitches.
Grab the tail with your right hand and keep the first two fingers of your right hand in place as you reach under the taught line with your left hand and grab the tail. Continue keeping the first two fingers of your right hand in place while your left hand lifts the tail up and around the other side of the taught line and feeds the tail to the fingers of your right hand.
Hook the tail through the Half Hitch.
Change hands so that your left hand is holding the tail. Use your right hand to put pressure on the rope going around the post. This will keep the tie from loosening while you tighten the Half Hitch.
In practice, this may not be necessary. If you are moving quickly, you can often get this Half Hitch locked before the rope has a chance to move. That said, I almost always do so anyway … muscle memory.
Using your left hand, pull the tail past the left side of the post to tighten the first Half Hitch. Then bring the tail back down into position below the knot.
Repeat Steps 4-7 a second time, exactly as before. Grab the tail with your right hand keep the first two fingers of your right hand in place as you reach under the taught line with your left hand, grab the tail and lift the tail up and around the other side of the taught line.
It is important that the tail continue wrapping the same direction for the second Half Hitch as it did for the first.
Feed the tail to your left fingers.
Pull through and tighten.
This is the completed Round-Turn, Two Half Hitches, a.k.a. RTTHH.
This is the completed RTTHH from another angle.
Anchor Hitch
This is almost the same as the RTTHH, but the first Half Hitch runs inside the cuff of rope. This one requires a different procedure to tighten it without losing tension. (Personally, I rarely use this variant unless the person I am tying wants to *really* fight against the ropes once they are tied.)
Experimentally, I am using “main hand” to indicate your dominant hand and “off hand” for your non-dominant hand. By doing so, the instructions below should work no matter your dominant hand. The only difference being that what you will see in practice will be the mirror of what you see here.
Run the tail halfway around the post, starting with the same side of the post as your main hand.
Put the fingers of your off hand between the rope and the post…
…the continue wrapping.
You can use the thumb of your off hand to hold the tail momentarily.
Use your main hand to grab the tail and run it under the taught line.
Move the tail around the taught line and feed it to the fingers of your off hand.
Hook the tail through the inside of the rope cuff.
Run the tail all the way through.
We want to tighten this cuff without losing any tension in the taught line. To do this, first transfer grip of the tail to your main hand, then use your off hand to grab the lower two lines of the rope cuff, the same two lines that become the Half Hitch you just created.
Using your off hand, begin pulling on those lower two lines to remove the slack from the rope that is running around the post. As you do this, keep the same level of tension on the tail, so that the Half Hitch remains still.
Once all the slack has been removed from the rope cuff…
Pull the tail with your main hand to take up that slack.
Add a second Half Hitch to lock the knot. To do this, Grab the tail with your off hand and keep the first two fingers of that hand in place as you reach under the taught line with your main hand and grab the tail.
Continue keeping the first two fingers of your off hand in place while your main hand lifts the tail up and around the other side of the taught line and feeds the tail to the fingers of your off hand.
Pull the tail through.
Tighten.
This is the completed Anchor Hitch.
This is the completed Anchor Hitch from another angle.
Slipped Version 1
If you have a little extra rope, you can ‘slip’ the second Half Hitch, making things (1) more orderly and (2) a little faster to untie.
Complete the first Half Hitch of either the RTTHH or Anchor Hitch.
If you have extra rope and want a cleaner finish…
…begin the second Half Hitch the same way, only…
…keep the ends of the rope from pulling through.
This is easier to do if you use a rope with knots on the end. If you don’t just leave a little rope not pulled through.
Tighten the same as normal.
Here is the completed “slipped” version.
Here is what it looks like from a different angle.
As long as you have tightened that second Half Hitch, it should be just as strong.
Then, when you are ready to untie it, you can just retrieve the ends…
…and pull them to release the outer Half Hitch.
Slipped Version 2
If you have more than a little extra rope, you can ‘slip’ both Half Hitches! As long as you seat both firmly, it should be just a secure, and this version is much more orderly than a chaotically dangling rope...
You can also slip *both* Half Hitches. Create the first Half Hitch as normal, only…
…keep the ends from being pulled through.
This is easier to do if you use a rope with knots on the end. If you don’t just leave a little rope not pulled through.
Now treat this grouping of four strands like a single unit and do a slipped Half Hitch with that group.
Use the same move as we have been showing throughout this tutorial.
Again, leave the ends of the rope *not* pulled all the way through.
Grab the thicker grouping of rope…
…and pull it past the post. Tighten it firmly.
Because there are more strands involved, there will be more space in this knot. I can be helpful to push the wraps of the Half Hitch more firmly into the knot like this.
This is the completed double-slipped RTTHH.
Again, when you are ready to untie it, just pull on the two bights that are by themselves.
Comments
Loading comments...
Sign in to leave a comment.