Corsets (a mini-course)
Learn the building blocks so you can easily design your own rope corset!
There are many ways to tie a rope corset. This is one of our modular concepts mini-courses. As such, it does not show a particular method to create a particular corset, but instead covers the underlying concepts and building blocks that will allow you to easily create your own!
A regular fashion or training corset is composed of several basic parts:
- Body (a.k.a... panels)
- Busk closure (usually the front opening)
- Boning (the stiff elements that give the corset its vertical stability)
- Lacing (usually the back opening)
This will discuss the rope version each of these components and will provide several options for each.
Before you begin this, you should already have at least a little experience in handling rope, doing tail pulls and the like, as well as the core knots and concepts covered in Rope 101 (www.TheDuchy.com/rope-101/).
BTW, This can take some time…
Creating a corset can take quite a while … or it can be surprisingly quick. It all comes down to how many tail pulls you have to do and with how long of rope. If you pick a wrapping technique that doesn’t require tail pulls, it is pretty fast. If you pick the TT3F8 option which requires two tail pulls for every wrap, it is going to take time. If you choose to add boning (which is pretty important if your partner is going to be moving around and you want the corset to be stable) you have faster and slower options there as well. If you choose the Crossing Hitch option with 2 tail pulls each, that will add to the total time. If you decide to add boning on the front and the back—which can look really cool—each boning run will take more time.
So … a rope corset is something that you put on for a party or a photo shoot or something, not usually something you add in the middle of a scene. It takes time and patience; you and your partner may want to put on something to watch while you are tying this on…
That said, if you choose the quick-release corset with weave boning, you can have that done in 15 minutes or so…
Risk factors:
One important Safety consideration with this or any technique that compresses the core: Positional Asphyxiation
If made too tight, a corset can impact a person’s breathing. When a person’s breathing apparatus—their diaphragm and their chest—are compressed, or limits are placed on how much they can expand, the person may have difficulty drawing a breath. General wisdom is to avoid compressing both diaphragm and chest at the same time.
Rope corsets bend and flex differently than do real corsets. Even if your partner is OK while standing straight, that can change if your partner is put into bent positions after the tie is complete.
Related: Even if a person can get enough oxygen, difficulty breathing can trigger anxiety, claustrophobia, and/or panic attacks.
As ALWAYS, have your emergency rope-cutting tool—EMT shears or an EMT hook—on your person, immediately to hand.
For this tutorial, I used 100' (30.5m) of rope for the wraps and various shorter lengths for the boning. This time I used some raw, unprocessed hemp rather than the Natural 1/4" (6mm) hemp I normally use, so you will see some loose threads in this one.
I normally use an amazing Natural hemp rope provided by my affiliate Twisted Monk. The only reason I didn't this time was because I don't have a single strand that is 100' and I wanted to show what this looked like with no joints.
This incredible set was tied and photographed by DaveMoose2019. It features the lovely and alluring Minerva Moon Girl. This began as a quick-release corset, then they added garters and a busk. Instructions for all of these may be found below. Every step looks amazing! Gorgeous work!
This lovely variation applying corset concepts to create a futomomo was developed by the adorable and talented knotty.darling. Check out her IG for other wonderfully creative rope!
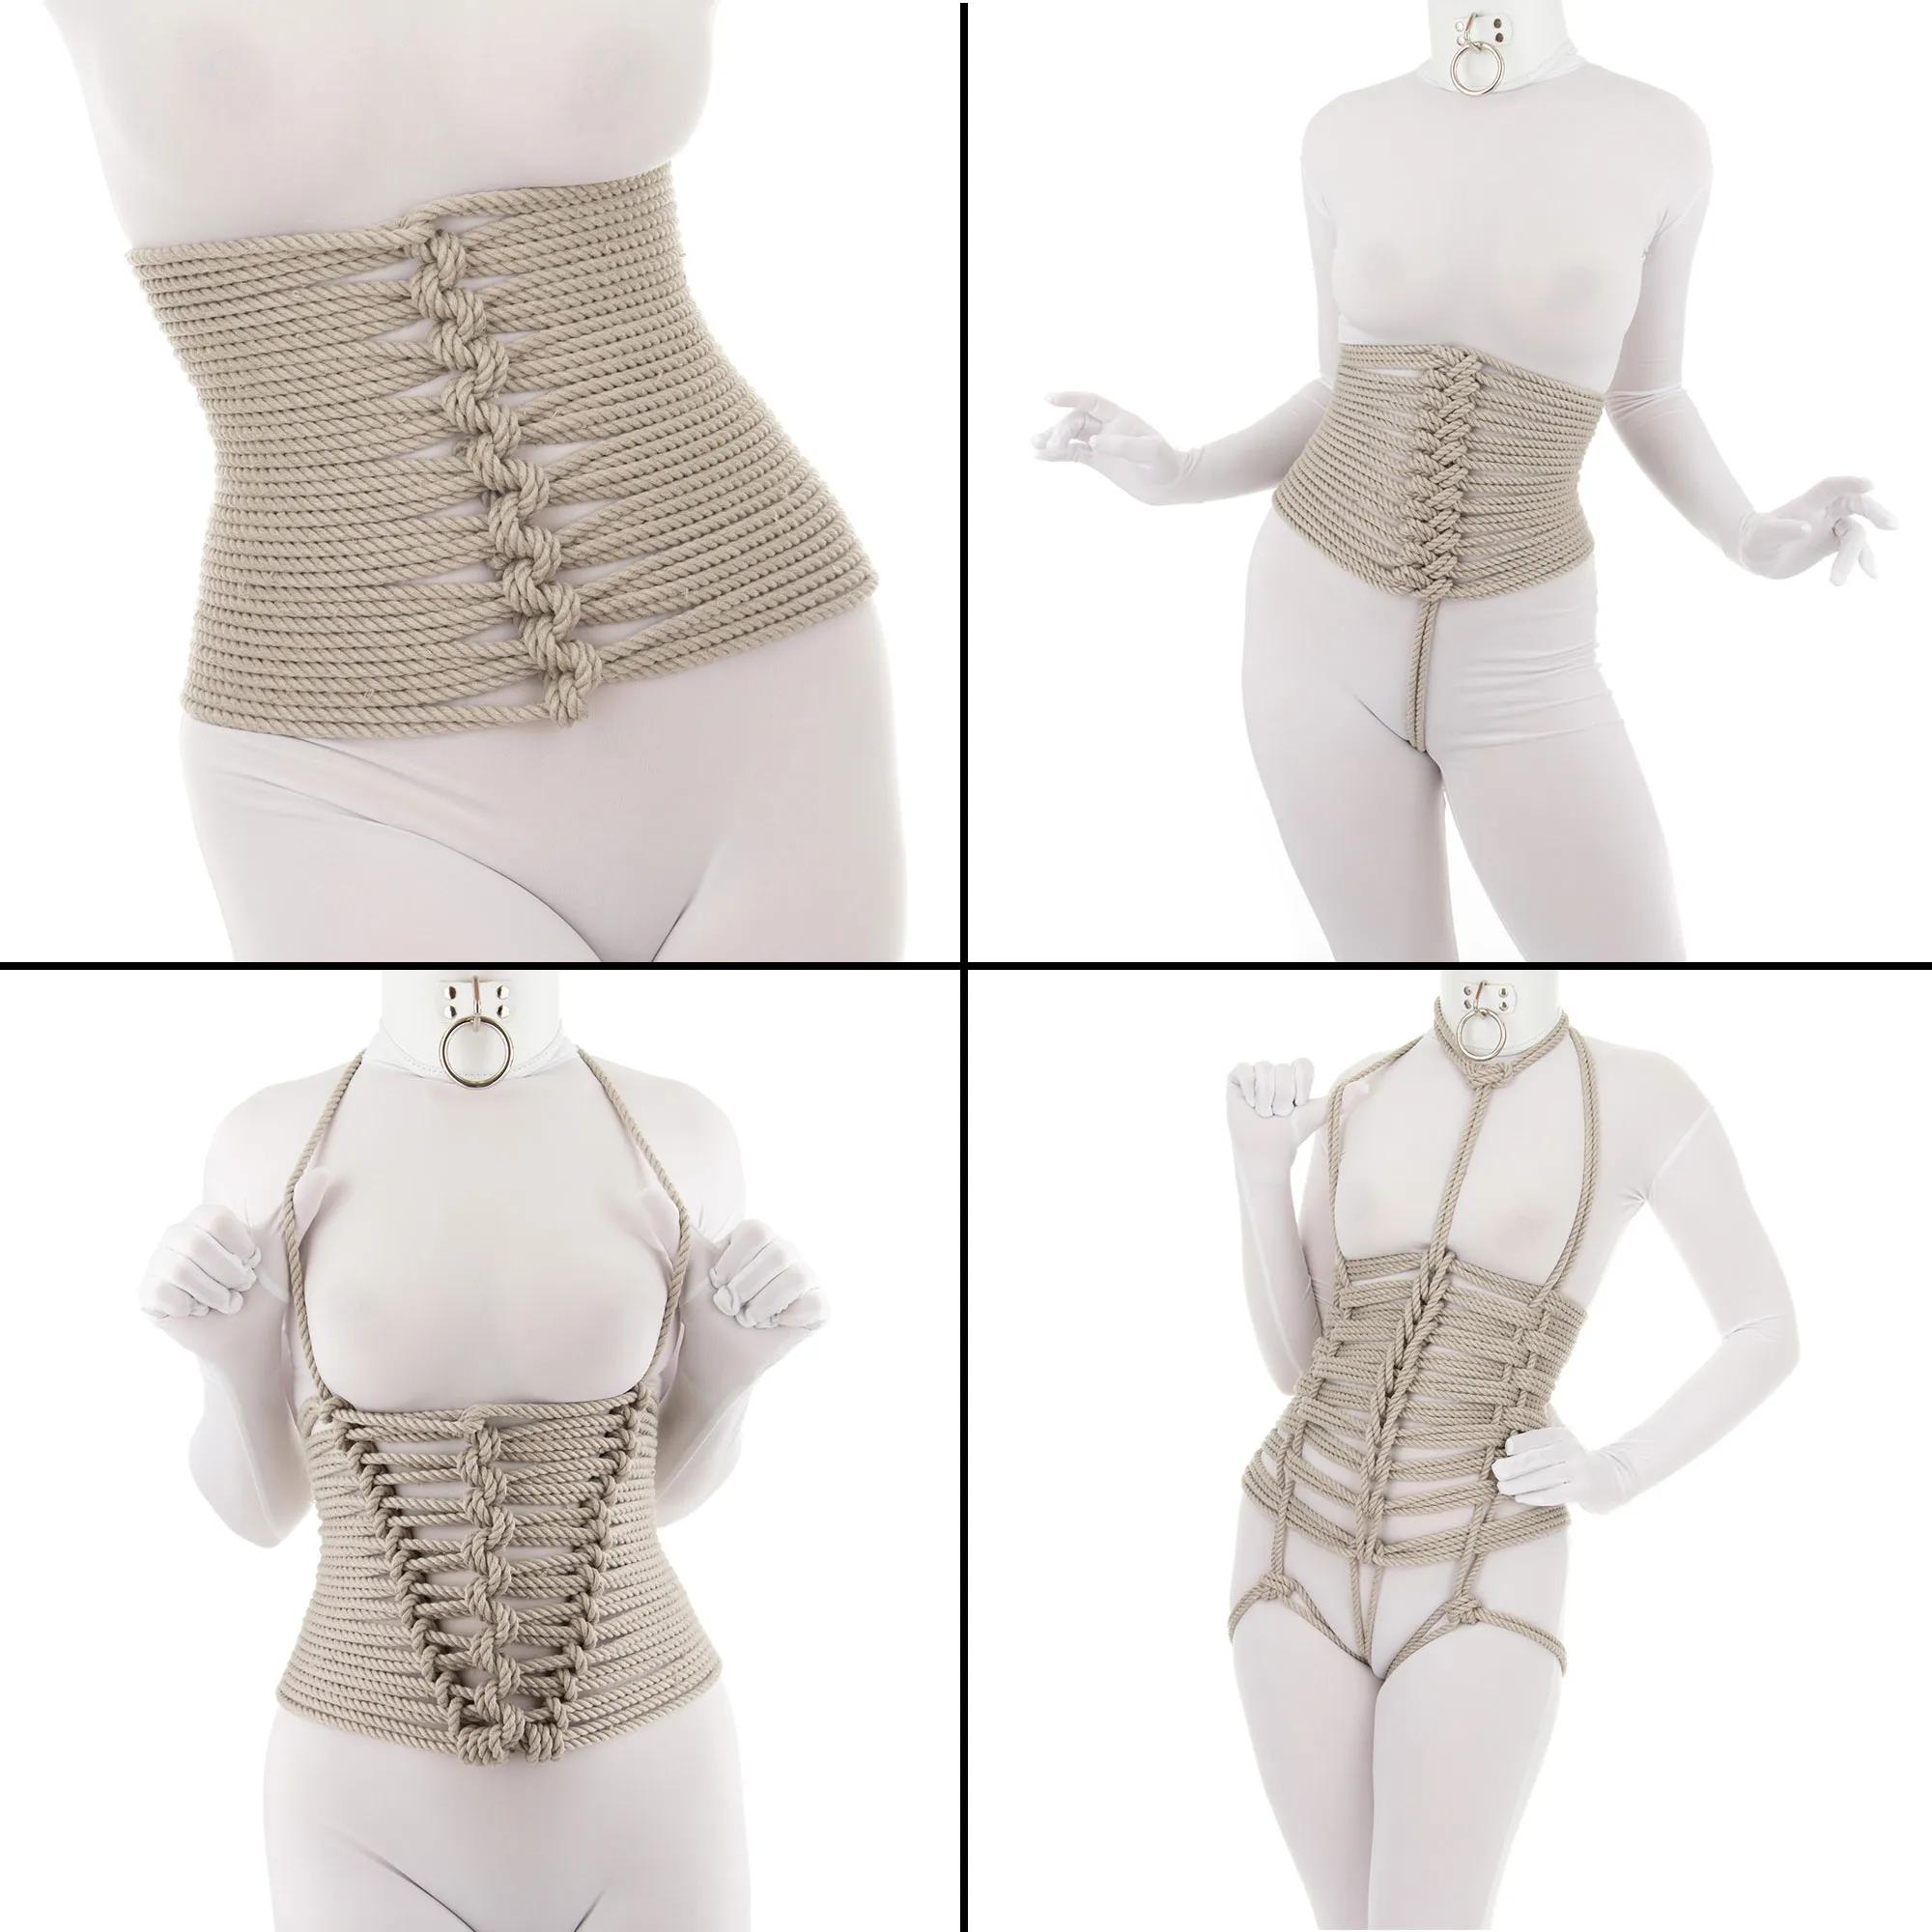
The basic structure of a corset
A corset is constructed of a few standard parts. There are many variations for each of these, resulting in many different corset styles:
- Body (a.k.a... panels)
- This is the “fashion fabric” etc, that provides the look and holds a person’s flesh in smoothly and tightly. The body panels are supported vertically by the boning and the stays (the internal belt that runs inside the tightest part of the corset to maintain the controlled waist size).
- Busk closure
- This is that cool-looking steel closure in the front
- It provides two functions:
- When the corset is laced, it keeps the front of the corset closed and provides vertical support and shape to the corset, keeping the tummy in.
- After you loosen the lacing, it can fully open to let you out!
- Boning
- These are the stiff elements (usually steel or stiff plastic) that give the corset its vertical stability.
- Lacing
- These run through eyelets in the back and allow the fit to be customized and the constriction to be changed as desired.
- Connections to other elements
- A corset is sometimes connected to other elements as well. At the top, perhaps it has shoulder straps or is connected to a collar. At the bottom, perhaps it has connections for garter straps or for some element that runs between the legs.
In creating a corset from rope, we replicate the ideas used in a real corset, but with variations and considerations:
- Body Panels are done in the form of Wraps
- When creating a rope corset, these are typically horizontal lines or wraps around the torso.
- When using rope, these are disconnected from each other instead of being part of one solid piece. Even more than regular fabric, individual cords will tend to sink in or pop out, even on a person with a hard body; therefore, just as with a real corset, we need Vertical Support...
- Vertical Support in the form of the “Busk” and “Boning”
- These are lines or knots created to keep the horizontal lines of the corset in order and to help prevent them from sinking in or popping out.
- The “Busk” is usually added—usually in the form of knots or a reversal of tension—as part of the process of tying on the Wraps.
- Optional “Boning” can also be added using the tail or with other ropes. This also gives you the option to incorporate other colors as well!
- There are many options for both the Busk and the Boning. We will discuss several below.
- Lacing
- It is rare to see rope corsets designed in such a way as to have lacing and that idea is not included in this tutorial. We do, however, have a tutorial showing one idea of how to do this in the Harley Quinn Corset series!
- Connections to other elements, above or below - Corset can also be more firmly held in place with connections to additional support.
- Garters
- Shoulder Straps
- Connecting to straps that are part of other elements like a chest harness or waist harness
Wraps & “Busk”
There are many ways to do the wraps. Here are 5 interesting options. Each has its own pros and cons, and each has a different look.
For each of these patterns, you can choose if you want the strands to be tightly-spaced or more widely-spaced. Having some natural space between the strands of the wraps allows for boning to be added more easily but changes the look.
You can also decide if you want a corset that covers almost everything from the lower chest to the upper hips … or if you want more of a waist-cincher look? It is entirely up to you! While you see real corsets that cover the breasts, it is not too common to see that with rope corsets. That said, there is nothing stopping you from doing so!
Important planning consideration: Repeatedly going around a person’s torso consumes a lot of rope. It requires less if you are using a larger rope, but the finished product will not look as smooth and any knots you end up using will be larger and bulkier. This is just a style choice. If you don’t want any rope joints, use a long rope. I like using a ¼” (6mm) rope; if using that size you can easily consume 80-100’ (25-30m) of rope even on a person with a smaller frame. But it is just fine to use your regular ropes; there is also something very cool about the look of doing this with regular 30’ (9m) ropes and having joints.
Simple Wrap Second Fastest Two tail pulls total (boning not included)
Continuous Reverse Tension Second Slowest One tail pull per wrap
Chain Stitch Middle Speed to put on, second fastest to remove Two tail pulls total (boning not included)
Tail-through-3 Figure-8 (TT3F8) Slowest Two tail pulls per wrap
Quick Release Rod Fastest No tail pulls
This is literally just wrapping a rope around your partner a bunch of times.
- Start with a Lark’s Head around the upper chest or connect the new rope to some other harness and then just wrap.
- This is easy to do, but either your partner needs to spin many times or you will need to run the rope around them many times. So, there is a good chance that someone is going to get dizzy.
- You need to have moderate tension and keep it consistent as you do the wraps. There is also very little to hold the ropes in place as you are laying on the layers, so you will have strands that lay higher or lower than others while doing the wraps until you add boning.
- This version will absolutely need to have boning added in order to keep it in shape or it will turn into a mess very quickly as soon as your partner starts moving.
Examples & Artist's Corner
Example: Simple wraps, end tucked under the wraps in the back, no boning. This configuration is very unstable until boning is added.
This adds a Busk at the front which gives you at least some stability during the tie.
This requires one tail pull for every wrap, so it can take time. Especially if you wish to avoid having rope joints and are therefore using a very long rope…
- Start this one with a Lark’s Head around your partner’s lower chest.
- Reverse tension and wrap the tail around your partner’s body, bringing it back to the front. Every time you add a wrap, make sure the ropes are parallel to the wraps before them and have the same tension.
- Each time you come back to the front, run the tail through the last bight you created and reverse tension, then wrap around the torso the other direction until you get back to the front again.
- One style consideration: If you want to up your game, decide how your strands are going to lay when you do the reverse, and keep it consistent. You can decide if the top strand coming into the reverse is going to remain on top coming out of it, or if it will remain on the outside of the curve. See the picture for a better understanding of the difference and what it will look like.
- Repeat until you have the look you want, adding rope if you need it. Then tie off or use up the tail in some other way.
Examples & Artist's Corner
Example: Continuous reverse wraps, end tucked under the busk, no boning
This adds a busk at the front, but you don’t need to do a tail pull for each wrap! You only have one or two tail pulls at the very end, depending on how you decide to end it. So, it is much faster to tie on than the other ones that have a busk, PLUS, it comes off very fast!
- Start with a bight at the front.
- Bring the tail around your partner, back to the bight, but only pull a little loop through.
- Hold that loop to prevent it from coming undone, then do a second wrap: run the tail back around your partner to the front again. Pull a small loop of the tail through your first loop to create a second loop. Tighten the first loop onto the second and adjust the tension in that second wrap.
- Up your game: Make sure the loop is done the same way each time. Folded under or folded over.
- Hold that loop to prevent it from coming undone. Do a third wrap, bring the tail back to the front. Again, pull the tail through the last loop that you just made (the second loop in this case) to make a new loop (the third loop in this case). Tighten the second loop onto the third loop, then adjust the tension of the third wrap.
- Repeat until you have the look you want, adding rope if you need it. Then tie off or use up the tail in whatever way you prefer.
Quick removal of the Chain-Stitch Corset
Examples & Artist's Corner
Example: Chain-stitch wraps, end between legs then run up the back in a herringbone boning pattern until the ends are used up
This adds a wider and firmer busk at the front which gives you more stability.
This requires two tail pulls for every wrap, so it takes even longer...
- Start this one with a Lark’s Head around your partner’s lower chest.
- Reverse tension and wrap the tail around your partner’s body, bringing it back to the front. Every time you add a wrap, make sure the ropes are parallel to the wraps before them and have the same tension.
- Each time you come back to the front, run the tail over top of the lowest three strands, then pull it through and reverse tension. Then run the tail over and through the lowest three strands on the other side and reverse tension again. Then wrap around the again until you get back to the front.
- Repeat until you run out of rope.
Examples & Artist's Corner
This is a very fast way to get wraps onto your partner. It requires no tail pulls. Just leave your rope on the other side of your partner and loop each wrap under the tip of the rod and tighten into place instead of pulling it through!
- Do your wraps around rod or cane.
- You will need to hold the rod in place (or have your partner do it) for the first few wraps, but once you have a few reverses done so you have opposing tensions, it will hold itself in place just fine.
- The neat thing about this version is that you can simply draw out the rod and the corset will fall right off!
Examples & Artist's Corner
Using up the tail after completing the wraps
If you have only a little rope left, wrap ends around lower strands.
If you have more rope left, wrap ends around lower strands, then use the remainder up by adding boning!
You can run the tail between the legs and tie it off on the back. On the way, you can add a "happy knot" if you like!
If you want to add a dildo to your partner, you can do so!
Boning
Even on someone with tight musculature, ropes tend to get disordered and ride on top of one another as the person moves … or even breathes deeply. Therefore, just as with real corsets, we need “boning” to help keep the shape more stable.
Take a lesson from the styles you have seen in real corsets: Things tend to look better if the boning is in a slight V shape with mirror symmetry around the middle of the front and the back. But you can also do boning that is straight or in a hourglass/chevron pattern: › on the left and ‹ on the right.
When doing boning, it can be challenging to run the strands and to get them to lay just exactly where you want them. A Marlin Spike, chopstick, etc, can be helpful.
There are many ways to add boning. Here are just a few:
Weaving
Repeated Running Loops - Under 4, Over 2
Repeated Running Loops - Over 4, Under 2
Herringbone
Repeated Crossing Hitch
Run a line above and then below alternate strands. To hold it well and keep the lines in good order, you need to run at least two strands for each bone. Run one strand go under when the other is going over so that you have opposing tensions holding things in place. You may find it easier to run one strand then the other.
You could repeat this all the way around to create a very firm and stable corset, but it would take a lot of rope and quite a while to do
Examples & Artist's Corner
Example: Simple wraps, new rope added and ends run upwards in a O4U2 boning pattern, then up into shoulder straps and tied off in the back
This is exactly the same as the O4U2 pattern above, but with the paths parallel and touching.
Examples & Artist's Corner
Example: Simple wraps, new rope added and ends run upwards in a O4U2 herringbone boning pattern, then up to the back of the neck and tied off.
Examples & Artist's Corner
Example: Simple wraps, new rope added and ends run upwards in a U4O2 boning pattern, then up into shoulder straps and wrapped around the top horizontal wraps.
Example: Continuous Reverse wraps, ends run wrapped around lower horizontal wraps 3 times, then run upwards in a U4O2 boning pattern, then upwards into shoulder straps and tied off at the back of the neck.
Examples & Artist's Corner
Example: Simple wraps, ends run upwards using Crossing Hitches as a diagonal busk or boning
Support from other elements above and/or below
But what if you want even more stability for your corset?
You can connect it to other elements!
Real corsets often have optional elements like straps that go over the shoulders or down to garters or between the legs, etc. You can incorporate fun little extras like that into your design, too! Doing so will provide anchor points above and below the corset to hold it more firmly in place; also the corset can act as an anchor to those other elements, allowing them to have fun tension of their own! Here are just a few ideas:
If your partner is already wearing a chest harness, you can add a new line and build from there!
Simply add a new rope to the lower chest strap using a Lark’s Head, then use the tail to either begin the creation of a rope corset (continuous-reverse style) or to add boning to a corset that is already there.
If your partner is not already in a chest harness, you can still add a connection point above your corset with a Lark’s Head Single Column around the upper chest or as a loose collar ... or both.
Then use the tail to either begin the creation of a rope corset (just as shown in above) or to add boning to a corset that is already there.
Examples & Artist's Corner
This particular corset was done with a Quick Release rod. Let's see what that can mean!
- Shoulder Straps > Boning > Garter/Thigh-high or to a Crotch Strap + Boning in the back of the corset
- Drape two new ropes over the back of the neck and then forward over the shoulders
- Use the tails on each side to add new boning elements. These can run in a more traditional V pattern from the outside of the corset on the top to the middle at the bottom, or can be run straight down to the leg.
- Tie off
- To thigh cuffs if the boning went straight down from the shoulders
- Perhaps braiding the remaining rope into a crotch strap if the boning was in a V from the shoulders to the crotch. If you choose this option, you can use up the remaining rope in additional boning at the back. (…Yes, I know exactly how that sounded…)
- Boning > Garters or Thigh-Highs
- Add boning to the front. Start with the bight simply folded over the top rope or with a Lark’s Head
- Bring the remaining rope down into boning of your choice.
- Use the remaining tail to make Garters or Thigh-highs
- A few options:
- Loop-Chain Thigh Highs
- Gingham Thigh Highs
- Thigh Cuffs/Garters > Boning > Shoulder Straps > Boning
- Add thigh cuffs/garters: This can be a Lark's Head Single Column around the thighs, with the tail leading upward, or whatever other approach you prefer.
- Add your preferred boning in the front.
- Run the tail over the shoulder.
- Cross the lines in the back. You can simply cross them, or for greater stability, you can tie them with a Square Knot or Double Coin Knot
- Connect the tail to the top line of the corset with a Crossing Hitch.
- Make them widely-spaced if you want to do a V pattern of boning down the back
- Make them narrowly-spaced if you want to do a Herringbone down the back
Wrap any remaining rope around the lower strands, or tie off to the garters in the back or use up the rope in any other way that inspires you.