
Gote Shibari
By Lazarus Redmayne
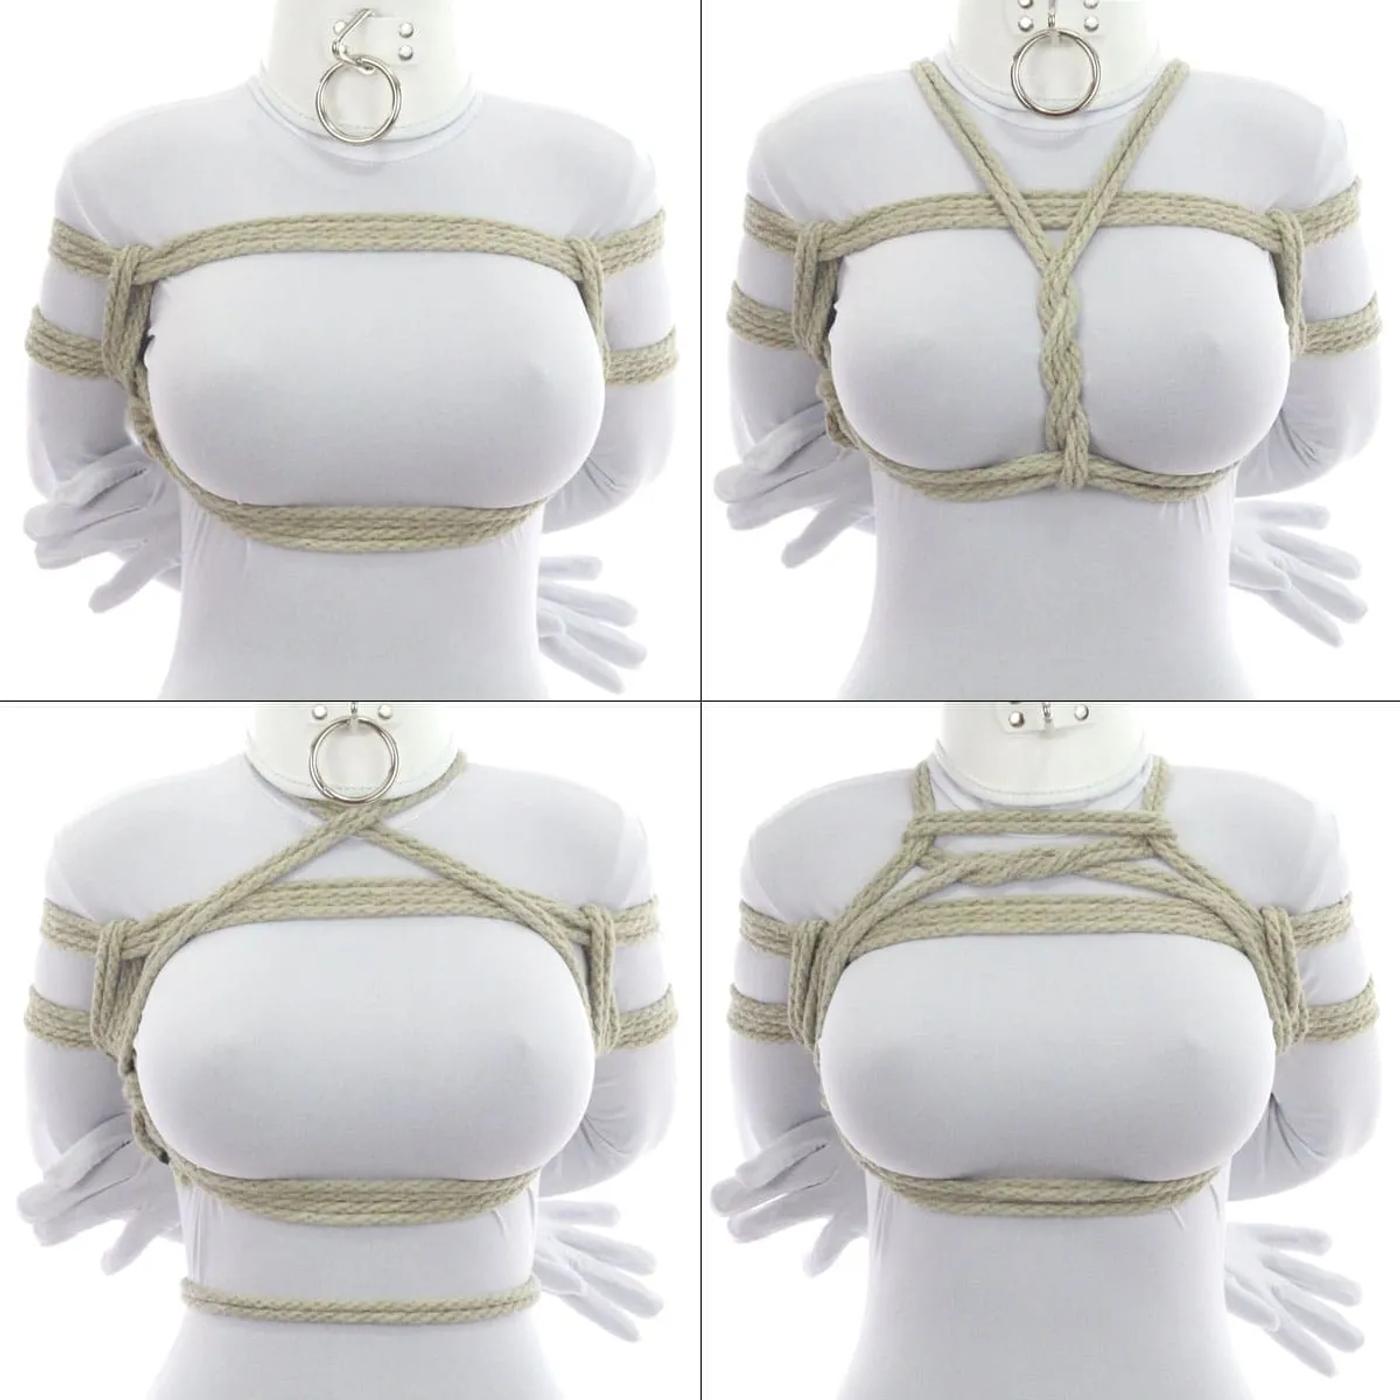
This is a go-to box tie used by riggers around the world. This tutorial covers the classic "2-Rope" version that is often the first/basic version that riggers learn and also covers 3 different common variants for the "3rd-Rope". Properly applied, this box tie is very difficult to escape from.
You may have seen this tie and its variants before under the name "Takate Kote" or “TK”. Technically speaking, the TK is a very specific variant of Gote Shibari with very specific procedural steps (with certain accepted variants). This tutorial teaches the same steps and variations that you may have seen labeled as a TK before, but it does not go over a number of the detailed technical elements included in the formal "TK", so this should better be referred to as "Gote Shibari" -- which translates pretty directly as "hands tied behind the back".
Note: There are quite a lot of steps in this tutorial, but once you have have practiced it and the moves are second nature, you can get this on your partner in 4-5 minutes or even less. I show each step in detail just to try to explain all the details and nuances. I often teach this tie as the capstone of my Bondage 101/102 series. It is often the first Intermediate tie that budding rope enthusiasts learn. So you should have a command of the Core Knowledge before you move on to this.
To see how this tie looks and works on different body types, check out both the pictorial and video versions! Thanks to the FABulous LeeLee Cocodrie for her help with the video!
This tutorial shows you how to do 4 different ties that are all built on the same base:
Risk Management and Safety
While you often see such box ties used in suspension, don't use this version a for suspension as it places the majority of a person’s weight on their arms, which can *very* easily cause severe injuries to the radial nerve if improperly placed or tensioned, and that damage can take months to heal. If you want to do suspensions with a box tie, there are far safer versions that place the load (tension, weight, stress) on the chest, instead of the arms. These chest-loading versions look almost the same, but their design results in lower risk when used for suspension.
Rope Needed
For this tie, I used one 30' (9m) and two 15' (5m) pieces of Natural 6mm (1/4") hemp provided by my affiliate Twisted Monk. Check them out for some amazing hemp rope!
Prerequisites


2TK - Video
This video contains:
The 5 steps for creating the classic 2-Rope Takate Kote (2TK)...
1. A single-column around both wrists [0.40] 2. The upper chest strap, secured by an X friction (Includes nerve safety) [1.10] 3. Cinch and lock the upper strap (add Kannuki) [2.37] 4. The mid-chest strap, secure with Square Friction or X Friction [7.06] 5. Cinch and lock the mid-chest strap [9.55]
...and 3 options for adding a 3rd rope (3TK), which provides for greater vertical stability and artistry
1. The Y-Harness [13.36] 2. The "3TK" or X-Variant [20.40] 3. The "Mt. Fuji 3TK" [29.35]
If you are just learning the TK, you should watch the whole video, but the [time] boxes will let you jump to any section, if needed.
The pictorial version for each Phase of the 2TK and each option for the 3TK are broken down into their dedicated sections below.
2TK - Proper body position, then a single-column around both wrists
Proper position for the arms is to have the wrists facing each other. The arms will tend to follow gravity over time and will pressing on the rope that are holding them up. You don't want that pressure on the sensitive inside of the wrists where all of those nerves and blood vessels could be impacted.
One hand tends to be in the crook of the elbow and the other somewhat cupping the elbow. If a person cannot do this, the TK may not be a good choice for them. Some work toward building flexibility so they can get in to this position will make the tie much more safe.
When we lock off the top band with our X friction (in the next Phase), we will be pulling up on the center line somewhat. This means that if we tie the wrist at their highest comfortable point, when we tighten the X-friction, we will be putting undue strain on our partner. So I usually have my partners put their wrists a little below that point, perhaps 2 inches (~5cm). You will take up that slack shortly (Step 14)
Tie their wrists with a Single-Column tie that can be untied from the wrist end. While I show three wraps in the picture, only use 2 (in practice, it is very hard to get 3 wraps evenly tensioned). It should be quite loose -- 1-2" (2.5-5cm) of slack. This will allow your partner to move their wrists enough to switch hand positions when one gets tired. ***You *also* want to take this moment to have them squeeze your first two fingers on one of your hands so that you can gauge their strength in this position before you begin the rest of the tie. You then know the baseline and can test that they have the same squeezing power as you continue the tie and your scene. If the squeezing power changes, they could have a pinched nerve or blood vessel and they need to be released. If that happens, untie the wrists immediately from the wrist end; letting your partner relax their arms helps alleviate tension through the whole tie immediately.
There are several forward-tension single column ties that can be used for this. You often see the Somerville Bowline, but if you choose that option, be sure to make it in the "slipped" form so that the bight can be pulled out in an emergency. Even though the Somerville Bowline *is* a forward-tension knot, it cannot be easily untied when under tension. If you slip it, you can then just pull the slip to unlock it and then untie from there.
2TK - (Optional) Cinch and lock the upper strap (add Kannuki)
The traditional form of the TK now adds Kannuki (locking cinches) to the top strap before moving on to the next strap. Kannuki ensure that the top strap cannot by moved up over the shoulders to release the bondage. However, that approach means that there are strands of rope running directly through the armpit, another area that contains many nerves and blood vessels. Many riggers are moving away from this approach to another that has fewer risks and that many rope bottoms find much more comfortable. This new approach is one that I will show in Phase 5, but I am going to take a moment to show you how to add Kannuki at this point in case you want a more classic look.
Make sure your X Friction is very solid and tight, then reach under your partner's arm from the front
Notice I am starting my next phase moving to the left again...
Reach under the front of the top strap from above and hook the tail
Pull the tail through. Then grab the strands of the strap and hold them flat and stable, while you...
...reverse the tension. The tail should cinch the strap a little closer to the body, but you don't want the strap so tight the strands are sinking deeply into the skin of the chest.. Also, you want this cinch to be in the middle between the arm and the chest to minimize the possibility of pinching.
Reach under the arm from behind and grab the tail and pull it through to the back
Run the tail behind the center line (you almost always want long-running cords to be as close to the skin as you can get them)...
...and under the other arm.
Repeat the cinching procedure on this side. Run the tail up above the strap...
Then, while holding the strap flat, reverse the tension and...
...bring it back to the back...
Again, run it under the center line
Some people just wrap the tail around the center line (or "stem") at this point. Others lock off this phase with another X Friction.
Let's do the X Friction version :)
...
...
...
...
...
...
OK, we have now locked of the Kannnuki with an X Friction.
We can now proceed with the next phase.
If you choose to do the Kannuki at this stage, this is what things will look like from the front at this point. That said...
...I have now removed all that we added in this phase, because I want to show you the alternative approach. So, this is how things look in the front as we move on to Phase 4
2TK - The mid-chest strap, secure with Square Friction or X Friction
Now we begin to create the second strap. You want this one almost exactly in the middle of the arm, right over the middle of the triceps, avoiding that valley between the triceps and deltoid
So...across the triceps
And across the middle of the chest. You want the rope to cross at least some part of the sternum, you don't want it running along the lower ribs; the ribs of the mid chest are much stronger.
If your partner has breasts you want that rope as high under the breasts as you can get it. If you partner does not have breasts, run the rope roughly 1-2" (2-5cm) below the nipples.
Run the rope over the middle of the arm, mid triceps, on the other arm
Again, taking care to avoid this danger zone
Bring the tail under the center line
...and continue on to make a second wrap tightly parallel to the first
When you run out of rope, just extend it
Try to place the knot as close to the end of the previous rope as you can. But also pay attention to were the knot lands. If it is on a bony part of the body or somewhere were it is not attractive, it is fine to move it. It just so happens in this case that it ends up in a great spot that shouldn't bother anything :)
Continue wrapping...
...and again bring your tail under the center line so that all strand of this strap are together
You can lock off this band with an X Friction, like we did for the top band, but many people use a Square Friction for this one instead.. Square Frictions are great for very strongly connecting two straps that cross each other as these are doing, and it can be argued that they provide a slightly tighter grip than the X Friction. We will choose the Square Friction:
Reverse tension around the center line
Reach under the inline cords from above and grab the tail
Pull the tail through, then give it a firm tug to ensure that it is tightly compressing the cords in the crossing line
Lay the tail over top of the center line, above
Again, pull firmly. The lines in the lower chest strap should deform as they are crushed together. This is what you want. That deformation shows you have it tight enough to have a good, strong grip
Then, reach under the in-line from below and grab the tail
Pull the tail through and give it a firm pull to make sure it is tightly griping the center line
You should see the cords from both bundles of rope being compressed tightly, like this
Run the tail over the center line again…
Then reach under the center line…
...and pull the tail through. This strap is now complete. On to Phase 5!
2TK - Cinch and lock the mid-chest strap
Option 1 - The Classic Kannuki - Choose this if you did the Optional Phase 3 above
We are going to be running the rope to the front to create the Kannuki, but we have two options on how to do so...
For Option 1 - The Classic Kannuki - go to Step 76 For Option 2 - The Alternate Approach - go to Step 82
(Option 1) If you already added Kannuki to the top strap (optional Phase 3) and now wish to take the classic approach for the lower strap as well, then run the line between the two straps by reaching through here to grab the tail...
If you are taking the new approach, jump to Step 82
...pull through
If you are taking the new approach, jump to Step 82
Just as you did for the top strap, hold the lines of the strap flat and even, then reverse the tension and lay the tail across the strands...
...and pull the tail to the back
Then continue as you did in Phase 3.
Option 2 - The Multi-strap Kannuki - Choose this if you did not do the Optional Phase 3 above
(Option 2) If you want to use the alternate option, run the rope underneath the lower strap (instead of between them)
Pull the tail to the front
Lay the tail over top of the lower strap lines, then reach under the upper strap lines from above and grab the tail
Pull through
Holding the lines of the strap flat, reverse tension on the tail
Put a little tension on it, but not too much. The goal is to prevent the upper strap from being able to slid up over the shoulders, you do not want to pull so hard that you start cinching the two straps together
We now want to run the tail behind the back to the other arm. There are two ways to do this. (1) Reach under the arm from behind and grab the tail, pull it through and then fish it behind the center line to the other arm, or...
...or, (2) you can grip the tail a little further down and then run the line underneath the arms to the opposite arm in one movement, by running it between the wrists and the small of the back! (fewer tail pulls, faster)
If you take this second approach, make sure the line of the tail makes it fully behind and past the wrists, up to the middle of the back so that it runs straight from one arm to the other as you can see here (the lowest horizontal line)
Once on the other side, do your multi-strap Kannuki just as you did before
Over the lower strap, under the upper strap
Pull through
Hold upper strap flat, reverse tension on the tail
Over the lower strap again...
...and back to the back
Pull through
If you plan to do the "Mt Fuji 3TK", skip the rest of this section and jump to that section
And run the tail under the center line so that all line of this Kannuki are on the same side of the center line
Like this. Now, if you are planning to do a 2TK, continue with this section....
If you plan to do the 3TK or Y-Harness 3TK, skip the rest of this section and jump to one of those sections
To lock off the Kannuki for a 2TK, you can use and X Friction or Square Friction. Here I use Square Friction just as we did for the lower chest strap ...
...
...
...
...
...
...
...
...
...
...
I have quite a bit of rope left over, so I would typically use that up by choosing one of the 3rd rope variants (see below for ideas). But for purposes of showing how to finish the 2TK, I am going to pretend that I only have a few inches left (not enough to go around the waist).
• If I had quite a bit left, I would now do a 3TK • If I only had a few feet (~1-1.5m), I would choose a Y-Harness 3TK. • If I had less than that, but enough to go around my partner's waist, I would run the rope around the waist then lock off in the back with a half hitch or two
All you do if you only have a little rope left is bring that rope up to one of the straps
Like this
Then tie it off somewhere up here with a series of half hitches, or by wrapping the rope around the strap lines and then tying it off
Once you are done tying it off, be sure to run your fingers under the both straps, one at a time, on both arms. This give you one last opportunity to confirm that the strands are all laying flat and have even tension, and to confirm they have not migrated into the danger zone between the deltoid and triceps
Here is the complete 2TK!
3TK - 3rd Rope Option 1 - The Y-Harness variant, aka ``Y-3TK``
Here are 3 options for adding more stability, security and artistry by adding a 3rd rope. These techniques can also be used to “use up” rope that you may have left over from your 2TK.
After locking off the lower-wrap kannuki, bring the tail up between the ropes and the body
Bring it across the shoulder (we have been starting all new elements to the left)
You have several options on how to make the front look. Option 1 is like the Bikini Harness. Option 2 is like the Shinju.
(Option 1 - Bikini Harness Style) Lay the tail over top of both straps
Reach under the lower strap, placing your fingers on the *same side* of the tail as the shoulder the tail just came over
Reach under the upper strap, placing your fingers on the *same side* of the tail as the shoulder the tail just came over
Like this
Pull the tail through.
The cords of the lower strap may deform slightly. Many riggers flatten them again, many do not. I have not done so in this tutorial
Run over the other shoulder. Skip to Step 15 to tie off.
(Option 2 - Shinju Style) Run the tail through itself below the top strap instead of above
Grab the tail
Pull it through and over the other shoulder. Alternatively...
...you can add and extra twist if you like...
Then run the tail over the other shoulder
Run the tail behind the upper strap and then tie the tail off to the center line or the strap on the opposite side. The next few steps show one way of doing so (many other ways are also just fine...)
I have a quite a bit of rope left, so I will go under the lower strap as well
Pull the tail through
Go across the center line
The lock it off with a half hitch or two
If you have a lot of rope left, you can use it up in a variety of ways
You can run the rope around the soft part of the belly, then tie it off back on the center line Or you could wind the rope around the strapsOr you could make a series of Crossing Hitches around the back like in a classic 3TK (or "X-3TK" as shown below)...
21 Here is the completed Y3TK from the front.
3TK - 3rd Rope Option 2 - The ``3TK``, aka ``X-3TK`` (Usually, if someone just says ``3TK``, they mean something like this.)
After locking off the friction that secures the Kannuki lines, reach through between the body and arm on the left side and grab the tail...
...pull the tail through
Run it across the chest to the opposite shoulder. If your partner has a different body type than is in this picture, this line may end up laying straight across the chest near the nipples.
To see how this lays on a different body type, check out the video version
Bring the tail to the opposite side again
Now we are going to do a series of Crossing Hitches. The trick to remembering which way to do them for a 3TK is to always put you fingers under the strap on the side of the tail that is closer the the center line, as I am doing here
Pull the tail through
Lay it over the incoming line
Reach under the strap again. Grab the tail
And pull it through to complete the Crossing Hitch. This BTW is just the regular "Crossing Hitch". We will do a Reverse Crossing Hitch on the other side...
Do a Crossing Hitch on the next strap. Remember that the first move is always on the side nearer the center line
Complete the Crossing Hitch then bring your tail down to the wrists
Put your fingers through the wrist cuffs pointing toward the other side
Grab the tail
Pull it through
You can add a little tension here now to give the wrist cuffs more support
Reverse the tension so the tail moves up toward the other side. We are now going to put Crossing Hitches in place going up this side. You can do the same technique as we did on the other side, but if you prefer symmetry and want the Crossing Hitches to be facing the same way, you can use the Reverse Crossing Hitch technique as I will do here. Start by reaching under the strap and grabbing the tail
You want the tension on the complete knot to be on the outside, so orient the tail side of the loop you are holding on to to be more toward the center line and the line with tension (coming from the wrists), to be on the outside
Pull just a little of that loop through
Your fingers are already in the loop, so now...
...grab the tail with those fingers
...then pull the tail through.
The first time you do this, it will likely turn out loose and sloppy, so you will have to work the knot a little to get it to lay the way you want. With practice, you will be able to do the Reverse Crossing Hitch just as quickly and solidly as the regular Crossing Hitch
If you need to, adjust the position of this Crossing Hitch so it is the same distance away from the center line as was the other side
Do a second Reverse Crossing Hitch (or Crossing Hitch if you choose)
...
Again, make sure it is positioned symmetrically
Bring the tail up to cross the other shoulder strap
...and lock it off with a Crossing Hitch before you proceed
From there, bring the rope over the shoulder...
...and cross it over the chest like you did the other. Some people like to put a Crossing Hitch at this crossing point as well, but I don't see that particularly often
Bring the tail down through the arms on the inside of the Kannuki
And bring it to the back
You can lock it off the center line or with two half hitches on one of the straps on the opposite side.
If you happen to have rope left over, one option for using it up is to wrap it around the soft belly and then tying that tail off to one of the straps on the back.
Here is the completed 3TK from the Front
... and the back
3TK - 3rd Rope Option 3 - The ``Mt. Fuji 3TK``
This variant begins in a slightly different place than the other 3TKs. Instead of locking off your Kannuki, to the center line, begin this immediately after bringing the tail through the arm after your last Kannuki.
...and lock it off with a Crossing Hitch directly to the back of the lower strap. To begin, run the tail up
Reach under the strap with your fingers on the side of the tail closer to the center line.
In order to have the Crossing Hitches facing the right way so that the tension tends to keep them closed and locked, always start them this way--with your fingers on the side of the rope closer to the center line/core of your partner's body.
Now put your fingers under the strap on the opposite side of the knot
Grab the tail...
...and pull it through
Repeat this procedure to put a second Crossing Hitch on the next strap up
This one will be a little closer to the center line. We will be running the tail over the opposite shoulder, so it generally follows that path
Run the tail over the opposite shoulder
...then straight down, on the inside of the Kannuki. Then begin running the tail around your partner's back under the arms...
...across the lower back--between the wrist and the back--to the other side
...to the other side. Be sure to pull it tight so that it slips between your partner's wrists and back and comes up to run parallel right next to the lines of the lower Kannuki
You can see the line we are working with as the lowest of the horizontal ropes on my partner's back in this picture
You might need to help the line get up where it needs to be, no worries
Now run the tail up on the inside of the Kannuki up to the shoulder
Run the tail to the back, crossing the other shoulder strap. Place you fingers under the strap on the side closest to your partner's core. Grab the tail
Lay the tail over the incoming line
...and then under the crossing line to form another Crossing Hitch
Add another Crossing Hitch to lock down the upper strap
If you like symmetry, you can use a Reverse Crossing Hitch here. It will then mirror the other side. I provide details on creating the Reverse Crossing Hitch in the X3TK section.
Lock the tail to the lower strap with another Crossing Hitch
Reach under between the arm and body from the front and grab the tail
Pull the tail through and begin running it across the chest
Reach under the opposite shoulder strap and grab the tail
Pull it through
Reverse the tension and run it to the other shoulder strap
Reach under the shoulder strap from the chest side. Grab the tail
Pull through and add some tension. This will pull the shoulder straps away from the shoulders a little, making them more comfortable and pulling them away from the nerves that run there.
Some riggers leave the ropes simply crossed here...
But many like to add a little twist here
...makes it look a little more like the top of a volcano... a la Mt Fuji...
Bring the tail to the back on the inside of the Kannuki
Bring the tail under the center line...
... so that all the lines from the Kannuki and the Mt Fuji are on the same side of the center line
And from here lock off with a Square Friction. Reverse tension...
...Under
...Over...Under
Pull tightly until the friction is very solid
Now tie it off. I have about 12" (30cm) of rope left, so I chose to run it over the center line and under the right-hand side of the Kannuki strap again, and then I wrapped one strand around and around the lower strap and then tucked the ends between the strands of the lower strap to lock it off....
Then I brought the other strand to the other side...
...and did the same thing over here
Competed Mt Fuji 3TK from the back
...and from the front.
Comments
Loading comments...
Sign in to leave a comment.